Wednesday, December 30, 2009

More Soup Please!


Since it's been quite cool around here these days, it just seems like soup weather. Reading on Facebook that so many friends were pulling out their crockpots to make soup gave me the incentive to play around with an old favorite. I've used the usual bean recipe but tweaked it with what happened to be in the fridge. Take heed and use up what you have lying around and you'll find all kinds of great combinations you wouldn't have tried before. Leeks and black beans? Yup. Kale and pine nuts? Yup. Just give it a try. I will admit I've made some real stinkers in the past, but that's the price you pay, Dear Chef, for experimenting. The majority of the time you come up with a winner.

Leek and Bean Soup
2 leeks, cleaned and sliced
3 carrots, sliced
1 red pepper (or 5-6 small, sweet red peppers)
3 cans black beans, drained
1 can pinto beans, drained
1 can stewed tomatoes
2 cups veggie broth
1 tsp cumin
1 tsp garlic powder
1/2 tsp cayenne pepper
1 cup frozen corn

1. Saute leeks, carrots and peppers until soft-about 10 minutes.
2. Pour the rest of the ingredients (except corn) into the crockpot and turn on high.
3. Pour veggies into crock pot, mix and cover.
4. Cook for 3 hours on high or 5 hours on medium.
5. Remove about 1.5 cups of the soup and set aside. Take an immersion blender and smooth out the rest of the soup in the pot.
6. Add retained soup and corn back to crockpot and stir. Wait about 5 minutes for corn to warm up.
7. At this point, add salt and taste. Adding salt while cooking beans can make them tough, so wait until the end to add it.
7. Serve with shredded cheese (optional) and tortilla chips. This soup comes out so thick, we use the tortilla chips and scoop it up like a dip. Hmmm, there's an idea.

You may recognize this as the soup we usually add Taco Bell taco sauce into. Today, I decided to go without and add my own spices. It came out with a great texture and just enough bite without making it too spicy. Feel free to add tabasco or more hot sauce if you want. I prefer to make it mild to start with.

Enjoy!

Tuesday, December 29, 2009

Pizza on the Fly

Since there are very few places we can head out to for a slice of pizza, what's a GF girl to do when she wants a slice? What if I don't want to make an entire pizza? What if I want it now, not after making it myself and letting it proof, spread it out, etc.?

I found the answer, at least here in Phoenix. Visit Gluten Free Creations (glutenfreecreations.com) in Phoenix and buy their Italian Pizza Crusts. There are 15 or 30 in a bag. They are individual sized, or enough for two if you eat a little at a time. I've been breaking them in half lately and baking the equivalent of one slice of pizza lately. It's the perfect size, and since I keep them in the freezer it breaks right in half very easily.

Why, other than their convenience right out of the freezer, do I like them so much? They taste great. They are crispy around the edges with the right amount of chewiness and just the right amount of oregano inside. They work with any topping and can be baked in about 10 minutes, no mixing involved. Tonight we had five teenagers hanging out and ordered pizzas, I baked mine in 10 minutes and we all had pizza together.

Some of my favorite toppings...
+ cheese and tomato sauce
+ red onion, mozzarella and toasted pistachios (try it, it's very good)
+ garlic, tomatoes and spinach
+ mushrooms and spinach
+ roasted corn and spinach

It all depends on what you like, as I'm sure you know dear Chef. I make sure to put the pizza in the oven on a large cooling rack. This way it's not touching the oven rack and it still gets the heat all the way around.

Enjoy!

Friday, December 25, 2009

Christmas Coffee Cake


First off, Merry Christmas to all my readers. I hope your day is lovely, and your year is even better. May your year be stress-free, full of love and contain lots of hugs.

On to the food- For the first time, we decided to have brunch rather than dinner with the family for Christmas. Since we're all up early anyway, why not all be together? It's much less stressful this way and we all get to enjoy each other's company. Grandma, Niece and Niece's SO joined Daughter, Husband and me for brunch in the morning. We opened gifts, drank mimosas with fresh OJ (4 trees right outside, you gotta' love Phoenix in winter), and ate till we dropped. It was a lovely day, low stress, easy food and plenty of hugs for everyone. There was even a hoola-hoop competition after brunch (Grandma rocked!)

I know it's a cardinal sin to try a new recipe on company, but today it worked out beautifully. With quiche tarts and fruit salad, we needed something else. I found a box of Gluten Free Pantry Coffee Cake mix in the cabinet and we gave it a try. After tweaking it a little, it turned out magnificent. The cake was moist and fluffy with a crunchy sweet topping I remember from my gluten-eating days. I felt as if I were cheating-it was that good. Even my husband, who would rather not eat GF if he doesn't have to, ended up eating 3 pieces and commenting on how great it was. Trust me, make this cake and nobody will know it's GF or I'm your monkey's uncle...(is that the right way to say that?) Anyway, you'll love it.


Christmas Coffee Cake
For the box recipe, you'll need:
1 egg/ 1 yolk
3/4 cup Yogurt or Buttermilk (I used regular milk, didn't have rice milk)
Butter (just a few tablespoons)
Gluten Free Vanilla
Gluten Free Pantry Coffee Cake Mix

My additions were:
1 cup chopped Trader Joe's candied pecans
1 tsp ground nutmeg
1 tsp cinnamon
1 tsp sugar

8 inch Spring Form pan

Just make the cake according to the directions. Add my additions to the topping mix and follow the directions from there. In just a few minutes, you've got a wonderful coffee cake to bring to a tea with friends or have with your honey when you have coffee in the morning. The best thing about this cake is that I made it the night before and it was still moist and fluffy the next day. Crazy in the GF world, right?

Enjoy!

Wednesday, December 16, 2009

GF Cookies with Extras


Ok, I love cookies. And we all know that going GF means going without good ones. Sure, I've found a few in a box that are so-so. And Cookies From Home in Tempe, AZ makes a great cookie dough you can freeze-I just wish it wasn't $10 for a batch. Makes it a special occasion only treat.

But I found a new boxed cookie recipe with promise. Once again, tweaking it makes all the difference. By all means, try it with the directions on the box, then try it my way. I've been working on trying to find an easy way to make cookies to bring with me on occasions and are GF-not an easy combo. But, dear chef, here they are...

GF Cookies with Extras
1 box Betty Crocker gluten-free chocolate chip cookie mix (see photo below)
1 egg
1 stick butter (1/2 cup) softened
1 Tbs raw/virgin coconut oil
1 Tbs brown sugar
1 cup golden raisins
1 cup candied pecans
1/2 cup white chocolate chips

1. Mix all ingredients together.
2. Split mixture in half. Make two logs and wrap in plastic wrap.
3. Place in freezer for about 30 minutes.
4. Preheat oven at 350 degrees while mix is in the freezer.
5. Slice frozen dough and place on an ungreased cookie sheet. Cook for 8-10 minutes or until golden brown.

I never said these were good for you, but when you're craving a cookie, this is it. Omit or add anything you want, dear chef, they are your cookies in the end. The coconut oil helps to keep them moist since GF products seem to get very dry after one day.

I've also discovered that freezing the dough makes the cookies a little chewier and less crumbly. You can keep this dough in the freezer and just pull it out and make a few cookies when you need them. Just make sure to freeze it first.

Store in an airtight container and try not to eat them all at once!

Enjoy!


Awesome Black Bean Soup


Throughout the ages, we're all looking for that great, quick soup recipe. Well, here it is. This is the reason for buying a crockpot, just to make this soup. I must give credit to the original recipe-I found it on crockpot365.com. I did have to tweak it, you know that's the way I roll. I love using a crockpot since the work is done for you. Follow the recipe and you can't go wrong (unlike the mushroom/broccoli risotto fiasco just a week ago in the crockpot. I won't even tell you how that turned out. Let's just say we all make mistakes!)

Awesome Black Bean Soup
3 cans black beans, drained
1 can stewed tomatoes, do not drain
2 cups veggie broth
6-9 packets Taco Bell mild taco sauce (yes, I'm not kidding)
1 TBS cumin
1 cup chopped carrots
1/2 cup chopped celery
1 cup frozen corn
shredded cheese (optional)

1. Pour all ingredients except corn and cheese into crockpot. (I usually spray the inside just to try and make cleanup easier).
2. Cook on high for 4-5 hours, medium for 8-10 hours.
3. At the end of the cook time, take out two cups of soup (trying not to get too many tomatoes) and use an immersion blender to blend it till smooth.
4. Return the reserved soup and frozen corn.
5. Cook for about 5 minutes to warm corn.
6. Serve with shredded Mexican cheese if you want, or even tortilla chips.

My daughter loves to scoop the soup with tortilla chips. I prefer to just eat it with a slight pinch of cheese. Husband adds a boatload of tabasco. Whatever floats your boat, dear chef. And I tend to double the recipe if I'm bringing it to a potluck. It goes over very big and is one of the first things to be empty.

Enjoy!

Tuesday, December 15, 2009

Beets, Beets and more Beets


Our local CSA basket has had some wonderful golden beets lately. Since my partner in veggies doesn't care for beets, I'm in heaven each week they are in the basket. Simple-olive oil, salt, pepper in a foil wrap and bake in a 400-degree oven for about an hour. Open and enjoy. I know there are so many other things you can do with beets, and I've done them, but nothing beats just roasting in the oven and eating warm. Yum! I can't wait for Wednesdays and I'm bummed when there are no beets. Rainbow chard is also a favorite in the basket, but I know, dear chef, that you've seen what I can do with that.

I highly recommend ordering a basket of locally grown veggies. Not only are you supporting a local business, but the time from dirt to your plate is minimal, not weeks. The vitamins are stronger, taste is better and chemicals are non-existent. Try it, you'll be helping the environment, your body, and a local business. And your cooking chops will be tested each week you open the box and say, "What the heck is that?" Cook it and find out.

I made a quiche tart with the spinach and beets in the basket, as well as the free-range organic eggs that week. So yummy, fresh and good for you. Just spray a tart pan, cook spinach and some onion until soft. Add eggs (I use 2 eggs and 4 egg whites) and pour into pan with veggies, then add some cheese if you want. (Fontina melts great). Then space a few beets on top and bake for about 35 minutes. Yummy!


Enjoy!

Wednesday, November 25, 2009

5-Minute Lunch


This took all of five minutes to make, and it's so yummy I can't stop eating it -but I will 'cuz I want to save some for later.

Tomorrow is Thanksgiving, and cooking for yourself today is probably not high on your priority what with cooking for 20 tomorrow? I'm not cooking for everyone for the first time in 15 years and instead we're taking veggies to my niece's place for dinner. Yes, there's a big turkey on the table (and a ham) but we're bringing a Quorn roast for ourselves and there are plenty of veggies.

But for today, it's veggie time. We picked up our CSA bag and it was full of golden beets and rainbow chard-Yipee-my favorites. Every Wednesday is like Christmas as we open the bag and see what's inside. I never keep the cilantro (I know, but I don't like it) and I always keep the beets. So for lunch today, after splitting the goods with my BFF, I had 5 stalks of rainbow chard left and I went to town. Count it-five minutes.

5-minute Rainbow Chard Lunch
4-5 stalks of rainbow chard, cleaned and chopped
1/4 cup pine nuts (toasted)
1/4 cup golden raisins
1 tsp chopped garlic
Olive oil
1 Tbs Romano cheese (optional)

1. Add chard to a large saute pan with olive oil (about a Tbs) and cook down. It will cook down to about half it's size, just like spinach.
2. While the chard is cooking, throw the pine nuts in the oven at about 350 for about 2 minutes or until they get slightly brown. (You can use a toaster oven or put them under the broiler on low, just watch closely since they burn quickly.)
3. Add garlic to chard and stir.
4. Add pine nuts, raisins and a pinch of salt to chard. Let cook for another minute.

Voila! it's done. I like to add a pinch of Romano cheese (grated) on top for a bite-but that's optional. The pine nuts give his a great texture and flavor and the raisins add just a bit of sweetness. My favorite part is the crunchiness of the chard, it's so refreshing and comforting. Dive in dear chef and have fun. Tomorrow you stuff yourself but today you can eat light and comforting.

Enjoy!

Sunday, November 15, 2009

Quinoa Frenzy


One more quinoa recipe, please. I found something like this at True Foods restaurant, a new place here in town serving gluten free and organic food. Wonderful. Using the ingredients in our weekly CSA basket, I was able to make a lovely quinoa salad that resembled the quinoa tabbouleh from True Foods, but was even better in my opinion. I found Inca Red quinoa at Sprouts and gave it a it a try. Wow, so good. Nuttier flavor than plain white quinoa. I think from now on I'm going to mix it half/half. It looks prettier that way and tastes great.

Red Quinoa Tabbouleh

1 cup red quinoa
1. 5 cups water
1 cup chopped red cabbage
1 chopped red radish (or two small ones)
1 cup chopped fresh baby arugula
1/4 cup chopped fresh parsley
1 tsp salt
Dressing
Juice of one lemon
salt/pepper
2 Tbs olive oil
1/2 tsp agave syrup

1. Rinse quinoa in a fine mesh strainer. Quinoa has an outer coating to scare off the birds and makes it taste bitter. Just rinse it off for a few moments.

2. Add quinoa to water and bring to a boil. Add 1 tsp salt and let simmer for 15 minutes. Quinoa gets little swirlies in the middle when it's about done. Let quinoa cool for about 30 minutes when done.

3. To make the dressing, add all ingredients to a small processor/blender and blend until smooth. Depending on the size of your lemon, taste and see if you need more oil, salt or pepper. You can also add garlic, dried parsley, etc. to your tasted. Experiment if you like.

4. When quinoa has cooled (you don't want the arugula and parsley to cook), mix all ingredients together. Add dressing slowly, saving some for later. Let salad cool a little more, letting the quinoa soak in the dressing. You may want to add a little more dressing after the quinoa has absorbed the first go around.

This is quick and easy, and can even be put in lettuce wraps and eaten. It's lovely at a pot luck lunch and provides tons of protein. The salad at True Foods had pomegranate seeds and Marcona almonds on top. Yum! I didn't have either one but I will next time.

Enjoy!

Monday, November 2, 2009

Quinoa Salad


I have embarked on the fantastic Nanowrimo boat (which is writing a 50,000-word book in 30 days) and therefore try to use my extra time to write. I'm attempting to make dishes this month that are easy to prepare and that I can eat over and over.

Today, I found fresh corn and cut all the corn right off and added it to black beans and quinoa-one word-marvelous. The corn was crunchy and sweet and the bean gave it just enough texture. I added a little fresh thyme from my garden, which gave it a wonderful flavor. Just don't overdo it, it's pretty strong.

If you don't have fresh corn, dear chef, you can use frozen-but never canned. Canned corn is just too mushy for this. You want the crunchy texture of the corn, and what's better than fresh?

Quinoa scares some people because it's so new and different and it's been compared in many ways to cous cous in texture. But this is not a grain, it's naturally gluten free and very high in protein, making it even better than cous cous and, I believe, much tastier. Give it a try, you'll be thinking up new ways to cook it as soon as you eat it.

Quinoa Salad
2 cups quinoa
2 cups water
Corn from three fresh cobs, cut off and rinsed
1 can black beans, rinsed (if you have time to soak some, that's even better)
2 Tbs olive oil
3 tsp salt
1 tsp pepper (to taste)
1/2 tsp fresh thyme
1/2 tsp fresh tarragon

1. Rinse quinoa in a fine mesh strainer. Quinoa has an outer coating to scare off the birds and makes it taste bitter. Just rinse it off for a few moments.

2. Add quinoa to water and bring to a boil. Add 1 tsp salt and let simmer for 15 minutes. Quinoa gets little swirlies in the middle when it's about done.

3. In a large saute pan, saute corn with 1 tsp salt and 1 Tbs olive oil. Saute for just a moment until warm, then add the beans and stir. Add herbs and pepper and stir till the veggies are warm.

4. Add quinoa to the veggies and saute with the last Tbs of olive oil. Mix well and serve.

By the way, this makes a lot of salad, enough for a few days of lunches so be aware. If you don't want as much, just cut the recipe in half and you're good to go, but I guarantee you'll wish you had made a big batch.

This is also great when it's cold as a salad. I couldn't wait until it cooled off before eating it and it was wonderful. Can't wait for lunch tomorrow.

Enjoy!

Sunday, September 27, 2009

Crunchy Wild Rice Salad


I had no idea that wild rice had so much protein in it. It has just about twice the protein as brown rice and it takes great. It's chewy and has a wonderfully nutty taste. So, when a friend made a cold wild rice salad, of course I had to go home and modify it.

I'm sure this can be changed according to the seasons. I love small sweet peppers and it's a great time for apples in season. But perhaps later in the year carrots and onions will work well. It's a great dish to bring to a potluck or take to school or work. I love that it's filling and satisfying with crunch and sweetness. Give it a try...

Crunchy Wild Rice Salad
1 cup wild rice
4 cups water
1 apple, chopped
1 cup yellow/red/orange peppers, chopped
1 cup raisins
1/2 cup toasted pine nuts
1/2 cup toasted sunflower seeds

Dressing:
2 Tbs Olive oil
1 Tbs Dijon mustard
1 tsp Garlic powder
1 tsp Agave syrup

1. Cook wild rice using package directions. I just add 1 cup rice per 4 cups of water, then simmer for about 45 minutes. Drain any water that's left.
2. Toast pine nuts in a 350 degree oven for just a few minutes. Be careful, they burn quickly.
3. Make dressing and adjust ingredients to your taste. I like mine a little sweet so I add a little more agave. Add some lemon juice if it's too sweet.
4. After the rice has cooled for about 30 minutes, mix all ingredients together and refrigerate. This lasts for a few days and tastes better each day as the flavors blend.

Enjoy!

Sunday, September 20, 2009

GF Veggie Lasagna


My cravings for lasagna have not gone away. Although I've made a GF version of lasagna using TJ's brown rice pasta (and it was yummy) I've been craving the kind Mom used to make. Finally, I came across these GF lasagna noodles. Pow! I've heard about them, and was so excited to see them at our local Whole Foods Market.

I will tell you that I put them in boiling water, let them cook for a minute, then checked the box to see how long it takes to cook them. Imagine my surprise when I saw "No Boiling - Oven Ready" right on the front. I turned the flame off but let them sit in the water while getting everything else finalized. They sat in there about 5 minutes, then I pulled them out and used them. They turned out great and I think I'll do it like that again. I liked having them just like "regular" noodles. But go ahead and try them straight from the box and let me know. Dear chef, lesson learned - read the directions before cooking.

This was made with zucchini and spinach, but give it a try with any of your fave veggies. I love carrots, yellow squash and mushrooms also. Can't wait to make all kinds of varieties now that I know it's an option to make lasagna. Even Daughter loved it.

GF Veggie Lasagna
4-5 GF lasagna noodles (pre-cooked or not)
2 zucchini, chopped
2 cups fresh spinach
1/2 cup chopped onion
2 Tbs chopped garlic
1 package silken tofu, drained and pressed
1/2 cup TJ's goat's milk mozzarella (shredded)
1 large can plum tomatoes
1 cup chopped and roasted carrots
dried oregano, parsley and basil to taste

This sounds like a lot of work, but it can all be going on at once. Don't let it intimidate you. It is so worth the effort and is truly a comfort food you will love.
1. Preheat oven to 350 degrees.
2. Put chopped carrots in a flat roasting sheet. Sprinkle with olive oil and salt, mix and roast in the oven for about 15 minutes.
3. Cook zucchini in a saute pan with 1/2 TBS of olive oil, salt and pepper until it becomes translucent.
4. Add spinach to zucchini by handfuls and let it wilt and cook.
5. Add 1 Tbs chopped garlic to veggies and cook for another minute, then put veggies in a strainer over a bowl to let the liquid drip off (too much will make the lasagna mushy).
6. Set a large pot of water to boil. When it boils, turn off the heat and add the lasagna noodles. Let them sit.
7. No need to wash the saute pan. Add the chopped onions and another 1/2 Tbs olive oil. Cook until onions are translucent.
8. Add 1 Tbs chopped garlic and cook for another minute.
9. Add tomatoes, salt, pepper.
10. Remove carrots from the oven. They should be carmelized and soft. Add to tomatoes, along with 1/2 tsp each of dried oregano, basil and parsely, mix and let simmer.
11. Place tofu in a bowl and add a 1/2 tsp each of dried oregano, basil and parsley. Add most of the mozzarella, leaving a little for the top of the lasagna. Mix well and set aside.
12. With an immersion blender (or regular blender if you don't have one) blend the tomato sauce until smooth. (If you use a regular blender, be sure to keep the top slightly open so you don't blow the top off the blender.)
13. Layer your lasagna in an 8X8 glass baking dish. Add sauce, noodles, half of the tofu mixture, half the veggies- then repeat. On the final layer, add noodles and sauce, then top with the reserved mozzarella.
14. Bake for 35 minutes until bubbly and cooked through. Let the lasagna rest for about 15 minutes before serving.

This is so much like Mom used to make. Yes, she used ricotta cheese, eggs and wheat noodles, but you'll be surprised how much this tastes like the real thing. It hits that comfort spot with a warm, bubbly sauce, al-dente noodles and wonderful veggies. Add a little leftover sauce and it's just like being a kid.

Enjoy!

Thursday, September 10, 2009

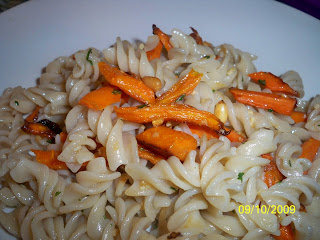
Roasted Carrot and Pine Nut Pasta


I bought a large, beautiful bag of sweet carrots from the farmers market, now what? I love eating raw carrots and I could eat them all day long. I whipped up some white-bean hummus and cut most of the carrots into sticks to dip. This was lovely and garlicky (I used a leftover head of roasted garlic in the hummus).

But there are still lots of carrots left. Daughter wanted pasta for dinner and I was hit with inspiration...roasted carrots in the pasta. The sweetness of the roasted carrots were divine and the nuttiness of the pine nuts offset the sweetness just enough. Daughter said, "I love these nuts, what are they?" Hmmm, something new.

Roasted Carrot and Pine Nut Pasta
1 bag Trader Joe's Brown Rice Fusilli
1 1/2 cups chopped carrots
1/4 cup raw pine nuts
1 Tbs chopped garlic
2 Tbs olive oil
1 Tbs grape seed oil
2 tsp dried parsley
salt/pepper

1. Preheat oven to 400.
2. Place carrots on a cookie sheet. Drizzle with 1 Tbs olive oil and 1 tsp Celtic sea salt. Mix and put in oven for about 20 minutes or until brown and carmelized.
3. While carrots roast, cook pasta as instructed on package (about 12 minutes). Drain and rinse in cold water.
4. In a large saute pan, heat the remaining olive oil and grape seed oil over medium heat. Add chopped garlic and cook over medium heat, being careful not to brown the garlic. If you do, start over again since the garlic can become bitter very easily.
5. Remove carrots from the oven and add to saute pan.
6. Place pine nuts on the pan used for the carrots and place under the broiler for just about 2-3 minutes. Watch carefully, they brown quickly.
7. Add pine nuts and pasta to saute pan. Add parsley last and mix.
Enjoy.

The secret to this dish is that roasting vegetables doesn't have to be a big job. Just throw whatever veggies you have onto the pan, mix with olive oil and salt and roast away. In the time it takes to make the pasta, your veggies are carmelized, sweet and browned. This is on my permanent list now.

Tuesday, August 18, 2009

Jambote (Leftovers with Eggs)


I've found myself on many occasions foraging through the refrigerator for something to eat. I'm not the kind who plans dinner for the week, shops then cooks ahead, etc. I'm more of the "what do I feel like eating today" kind of person. Lately, I'm the "what do I feel like eating that's in my fridge" kind of person. What is always in there? Eggs, veggies, Diet Coke (I know, I know), rice cheese, carrot juice and the freezer usually has a few frozen GF pizza crusts, Sunshine burgers and Daughter's Trader Joe's quiche (not GF.)

Eggs and veggies are always a good bet. I've usually got leeks and some kind of colorful veggies, but whatever you've got, just saute the veggies, add an egg and viola-dinner. Here's my plan for what my mother calls "Jambote" or everything and an egg in the pan. Mom used to add potatoes to the mix, but I find that much too filling. But go ahead and try it, I loved it when I was a kid. It was Sunday morning breakfast-leftovers, potatoes and eggs.

I made one the other day with leeks and yellow squash. It was wonderful. This time, it is much more colorful and makes a better photo-op.

Jambote
Any veggies available
For this one, I had 1/2 a zuchini and 1/2 red bell pepper
1 egg plus 1 eggwhite
dash of nutmeg (1/4 tsp)
salt/pepper
1 Tbs fresh parsley, chopped

1. Saute veggies (about 1 cup) in grapeseed or olive oil
2. Beat egg and eggwhite in a bowl with salt, pepper and nutmeg
3. Add egg to veggies when they begin to soften.
4. Add parsley close to the end of cooking.
4. Cook until your desired doneness. I like mine pretty well-done.

This is quick, easy and very tasty. It's filling, full of veggies and provides a bit of protein.

Enjoy!

Monday, August 17, 2009

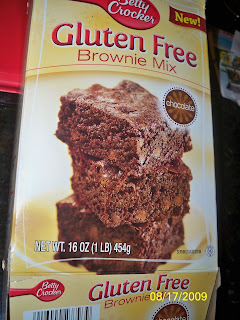
Betty Crocker Gluten Free Brownies


Today's review is short and sweet! YUM...
While shopping in Safeway tonight, I came across the new Betty Crocker Gluten Free Brownie mix. I thought it sounded wonderful and since I'm coming off of 2 weeks without sugar, what could be better?

The box calls for 2 eggs and 1/4 cup of melted butter. To keep as dairy free as possible, I substituted 1/4 cup of grapeseed/coconut oil instead (I did add the two eggs). It didn't seem to make a difference in the brownie itself and the taste was wonderful. Daughter at three pieces and didn't want to eat dinner. My husband, who usually avoids anything gluten free or vegetarian, ate two brownies and wanted more.

These are gooey, chewy, chocolaty and sweet. The mix even has chocolate chips in it, which makes the brownie even more chocolaty and yummy. It is so gooey when warm, daughter suggested putting vanilla ice cream on it. Sounded great except we didn't have any, which was a good thing considering I'm trying to leave out dairy right now.


If you see this in the store, give it a try. They are crunchy on the edges, chewy on the inside and very chocolaty. I don't think most people could tell the difference.

Enjoy.

Friday, August 7, 2009

Roasted Golden Beets with Horseradish Dip


Golden Beets at the Los Osos Farmers' Market. Aren't they beautiful?

I've got beet fever! A month ago I visited a good friend in San Luis Obispo. I was never a big beet lover, but when we bought some golden beets at the local farmers market and she cooked them up, I was a convert-big time. They were tender, sweet and so very tasty. I was hooked.

Flash forward to my return to Phoenix. Not the mecca of fresh vegetables in summer that San Luis is...I searched for golden beets. Just the other day-Paydirt! Our local Wholefoods had a beautiful selection and I dug in.

My recipe for roasted beets is partially from an old cookbook on roasting veggies, and partially from what I had in the fridge and I'm not allergic to. It's that simple. But these were so wonderful, carmelized and yummy, it took every inch of self control not to eat them all in one sitting.

Even if you're not a beet lover, try them. I promise you will change your mind. (Don't let the dip fool you, it's spicy, tangy and a great combo to the sweet, carmelized beets.)


Roasted Beets with Horseradish Dip
6-8 golden beets, scrubbed, peeled and quartered
2 Tbs olive oil
2 Tbs agave syrup
salt/pepper

Horseradish Dip
2 Tbs Veganaise (vegetarian mayo, or you could substitute sour cream or regular mayo)
1 tsp horseradish
1/2 tsp cayenne

1. Preheat oven to 400
2. Peel and quarter beets and place in a large foil square.
3. Mix olive oil, agave and salt/pepper. Pour over beets and mix to cover all. Wrap foil loosely around beets.
4. Place in oven and bake for 1 hour.
5. Test to see if the fork goes in easily. I opened the foil and baked for another 30 minutes to get a beautiful golden carmelization. I'm always surprised at how long beets take to cook.
6. For dip, just mix veganaise, horseradish and cayenne. Serve as a dip with the beets.

These are so sweet and satisfying. And on top of that, they are so good for you. If you can't find golden beets, by all means use the red ones. Just be careful peeling them since they may stain your hands more than the golden beets. But it's certainly worth it.

Enjoy!

Monday, July 20, 2009

Almond/Cashew Protein Bars


Up until just a few weeks ago, I could not find a protein bar/snack that I wanted more than once. I've been trying to find a good packaged one for years. But all of them taste terrible. I like Lara Bars, but they are sticky and lacking chocolate. They are good for long plane rides and such.

Recently, I visited a new breakfast joint in town, Over Easy, and they have a wonderful house-made protein bar. It listed almonds, flax meal, coconut and chocolate. It was a hit. I loved it, but at $3 for each 2" square, I realized I couldn't hang out there every day when I wanted one-I'd go broke.

So, I came home and tried to make it on my own. After a few tries that were great, I came across a version of it on Elana's Pantry (see link on right). Elana makes some wonderful GF food on her site and I love looking for new ideas. I tweaked both Elana's and Over Easy's recipes and came up with what I call my Almond/Cashew Protein Bar.

So far, I've been told by a few people that I should sell it, it's so good. It's salty and sweet, crunchy and filling. I love the chocolate on top, just enough to sweeten the deal. It's like eating a candy bar that's good for you. It's just hard to stop, although a little goes a long way. Give it a shot and let me know if you change it in any way. I've thought about adding dried fruit, or some raw pistachios-the possibilities are endless when you think about it.

Almond/Cashew Protein Bars
1 cup raw almonds
1 cup raw cashews
1/2 cup flax meal
1/2 cup shredded, unsweetened coconut
1/2 cup unsalted, raw almond butter (crunchy)
1/2 tsp sea salt
1/2 cup coconut oil
1 packet stevia powder
1 Tbs agave nectar
1 Tbs GF vanilla extract
1 cup Enjoy Life GF, DF, CF chocolate chips

1. Mix first six ingredients in a food processor for about 20-25 seconds, should still be coarsely chopped and mixed.
2. Heat coconut oil over low heat and remove.
3. Add stevia, agave and vanilla to coconut oil and stir.
4. Pour coconut mixture into almond mixture in food processor slowly until completely mixed.
5. Pour mixture into a sprayed 8x8 glass baking dish.
6. Refrigerate for about 30 minutes.
7. Melt chips in microwave for 20 seconds, stir then microwave another 20 seconds. Continue until chips are melted. Do not microwave too much or you'll ruin the chips.
8. Pour chocolate over bars, spread evenly and return to fridge for at least 30 minutes or longer until hardened.
9. Cut into squares and serve.

If you're going to save these, as I do, to eat in the next few days, store in an airtight container in the fridge.

Enjoy!

Sunday, July 5, 2009

Veggie Feast

I decided to use a few fresh, organic veggies and do it up right. I love the strong, earthy bite of kale and have never really cooked with it before. And my new-favorite veggie these days is chard, with it's beautiful color and kick of flavor. I used to use escarole more often, but I like chard's distinct flavor and texture. Either one would work in place of the other, in my opinion. Enough garlic and everything tastes great.

I've made two dishes today and put them in the fridge (after sneeking a bunch for myself). I'll save them for dinner/lunches in the next few days. One dish is a variation on the last post I did using a red chard this time and white bean. The other is something of a variation on a dish I saw at Whole Foods that had steamed kale and soy sauce, sesame oil, etc., except theirs is not GF and therefore I can't have it. So I just made my own version.

Both are simply delicious. Make enough to save and snack on later, I can't stop picking at them when I open the fridge. Somebody stop me...

Red Chard with White Beans
1 bunch of red chard, cleaned and chopped
1.5 tsp olive oil
2 cloves garlic chopped
1 can white cannelini beans, rinsed
1/2 cup marinara sauce
salt/pepper

Simple dish...
1. Place chard in a hot saute pan with the oil over medium heat. Toss in the pan until it's wilted
2. Add the rest of the ingredients. Mix, simmer 10 minutes and voila. Next!

The flavors are even better the next day since they have time to infuse. The stems are still crisp, just the way I like them. I think I'll make some GF rolls to eat with them. Yum...


Steamed Kale with Golden Raisins
1 bunch kale, cleaned and chopped
1/4 C golden raisins
salt/pepper

sauce:
2 TBS GF tamari sauce
1 tsp sesame oil
1/2 tsp garlic powder
1 dash cayenne
1 tsp chopped parsely
1 tsp rice vinegar
1 tsp agave nectar

1. Steam kale leaves in a saute pan with a 2 TBS water on the bottom. Cover until wilted but still crisp (water should be about gone).
2. While kale is steaming, mix sauce ingredients in a small bowl. Taste and tweak it to your liking, add more soy, more sesame, etc. until you have it just right.
3. Pour sauce, salt, pepper and raisins into pan, toss and turn off heat and let it sit for a few moments for the flavors to marry.

I like to server this one cold. Let it cool in the fridge before serving. The bite of the kale with the sweetness of the raisins is so satisfying.

Feel free, dear chef, to experiment with adding almonds, different greens, different beans, etc. These are so flavorful they would make a great side dish, or stand alone on their own.

Enjoy!

Sunday, June 28, 2009

Simple, Rustic dish


This is probably more of a winter dish, but since I wasn't feeling well I wanted something comforting and soothing. Warm, hearty dishes do that for me. This was inspired by my good friend Maegen, a wonderful chef and friend who gave me the wonderful smoked paprika on my last trip out to California.

Rainbow Chard with Garbanzos

1 bunch of Rainbow Chard, chopped (stems and leaves)
1 large clove of garlic to two smaller ones, chopped
1 can garbanzos, rinsed
1 TBS grapeseed oil
1/2 cup veggie broth
1/2 C golden raisins
About 1/4 C shredded Romano (optional)
1 tiny pinch of smoked paprika (a little goes a long way)

1. Heat large saute pan with oil. Add galic and cook for a minute.
2. Add chopped chard and saute for a few moments, giving the chard time to wilt.
3. Add beans, salt, pepper, raisins and broth.
4. Saute till everything is warmed through and chard is cooked through.
5. Add paprika and cook for just one more minute.

Serve with shredded Romano. The smoked paprika gives it a warm, smoky taste. Just what I needed to warm my tummy. If you don't have smoked paprika, which I never did before, this is still delicious on it's own without it. I tried it before adding the paprika and it was wonderful.

Enjoy!

Saturday, June 27, 2009

Dinner at The Park


I had the most wonderful vegetarian, gluten-free experience and I just had to share with everyone. My dear friend, Maegen Loring, is chef/owner of The Park restaurant in beautiful San Luis Obispo, CA. With another dear friend, I traveled there to spend a wonderful weekend filled with wine tasting, girl talk and feasting. For our first night there, Maegen planned a fabulous gluten-free, vegetarian, 5-course meal. At a fine-dining establishment like this, it was so much more than I had ever asked for. I'm so grateful to Maegen, her husband, Jeff, and their wonderful staff for making our night such a culinary experience. I've documented it as well as I could, but remember I was trying to eat it as fast as it came out at times, as well as drinking the wines that were paired with everything...remember this is wine country!


First course: Grilled red pepper with a pesto and pine nuts on top. Drizzled with a wonderful vinaigrette. Just the perfect start to a beautiful meal.


Second course: Chickpea soup with carmelized onions, smoked paprika and a drizzle of olive oil. I had never had smoked paprika before and it was so lovely. The wonderful smoky aroma, mixed with the firm texture of the chickpeas was heavenly. Having a friend in the business is great since Maegen even gave me a bag of the paprika to take home. I can't wait to use it. I love garbanzos and cook with them often.


Third course: Fava bean puree with fennel, topped with zucchini, grapes and a red pepper coulis. Wow, the crunchiness of the zucchini and the creaminess of the puree were just perfect. I have never eat fava beans and they were fabulous. I know they are difficult to prepare and take a lot of time, but I can see now that they are worth all the effort. The grapes gave the dish just a touch of sweetness that made it complete.


Fourth course: We're on our second bottle of wine and making our way to the dish I've been waiting for all night: the beet risotto. I love risotto and although I make it infrequently, I just love the rich flavor and creamy texture. Maegen's is made with beet puree added at the end to give it a brilliant color and taste, as well as grilled asparagus, a touch of creme fraiche and a dash of mint oil. Wow! My taste buds were in heaven. I was getting pretty full by now, but I had to eat the entire dish because I wasn't sure when I would have this again. It was incredible and now one of my top five favorite dishes.


Finally, dessert: To put a perfect end on a delightfully perfect meal, we start with a glass of La Vie late harvest Chardonnay. A sweet, dessert wine with a touch of honey flavor. Lovely (I brought a bottle of it home also, Thanks Jeff!). This is paired with an apple cider sorbet topped with fresh berries and fried sage leaves dusted with powdered sugar. Beat that! The flavors were tart, sweet, mellow and bursting in your mouth. It was the perfect ending to a dinner I did not want to end.

The weekend of feasting was not over since my dear friend continued to cook for us with fresh produce from the local farmer's market over the course of our stay. If you don't already have a friend who is a gourmet chef with a restaurant, I highly recommend it! And if you're in or near San Luis Obispo, stop in at The Park restaurant, I know you'll love it.

We're heading back soon with my husband in tow since I told him all about The Park's Wednesday Burger Night...complete with homemade buns, homemade fresh ketchup, thick fries cooked in duck fat and an array of gourmet burgers. Of course, I won't be eating any of this, but I know my husband will love it enough for both of us. Maybe there's some of that beet risotto left???

Visit The Park at the link to your right.

Thanks Maegen!

Friday, June 26, 2009

"Not" Tuna Boats

Wow, this raw food life is really fun. I’ve been working on making as many new raw foods as possible, and it couldn’t be more rewarding. I feel great, and although I’m hungry every few hours, I know that what I’m eating is clean burning and good for me. No regrets about a piece of chocolate or a few chips (although, those things never hurt anyone).
Today it was “Not” Tuna. Once again, I tried this recipe while at a raw-food meetup and I couldn’t believe how great it was. I took the recipe from the meeting, then found a few online and changed a few more ingredients. For instance, many recipes call for Dulse flakes (a certain type of seaweed), but I didn’t have any so I just crumbled up some Nori that I had in the cabinet.
Bottom line, I’m crazy about it, especially since it has tons of protein from the almonds and sunflower seeds, Omega 3s from the flax seeds and to my utter relief, dear chefs, no little fishies gave up their lives for my lunch. If the ingredients look strange to you, just take my word for it. You’ll be amazed if you take the time to make it just once. A friend happened to come by and I gave her some on a lettuce boat... she loved it, and took some home with her. You won’t be disappointed if you decide to be adventurous... go on, give it a try.

“Not” Tuna Boats
½ cup raw sunflower seeds (soaked 8 hours or overnight)
½ cup raw almonds (soaked 8 hours or overnight)
Juice of one lemon
Sea salt
1/5 Tbs ground flax seeds
1-2 sticks of celery, diced
1 Tbs chopped sweet onion
1 Tbs chopped/crumbled Nori (or 1 TBS dulse flakes if you can find them)
¼ apple diced
Whole Romaine lettuce leaves, washed and dried

1. Rinse seeds and almonds and place on a paper towel to dry for a few moments.
2. Run seeds and almonds in a blender with a little water until it makes a paste. Add water a little at a time so it doesn’t get too runny.
3. Remove mixture from blender and add all other ingredients.
4. Serve in Romaine lettuce boats.

Variations: I added a few extra grapes at the end, and the apple was an afterthought also. A roommate of mine always liked her tuna with onion and dill. Actually, you could also add dill, mustard, more onion, raisins, fresh parsley, garlic, etc. Go crazy and add anything you like, play with it and make it just the way you want it. Just one or two lettuce boats makes a great snack or lunch. I plan to make this a weekly staple in my house. It lasts for about 5 days in the fridge.

Enjoy!

Tuesday, May 26, 2009

Zucchini Pesto "Pasta"

Well, another day of healthy eating. Started out the day with a green smoothie. Yum! Just add a frozen banana, handful of frozen mango chunks, handful of fresh blueberries, very large handful of raw spinach and a squeeze of agave syrup and just a little water. Blend until smooth...it's amazing. The spinach gives it so much in the way of nutrients and such, but the only way to know it's there is with the bright, beautiful green color. Other than that it tastes just like a regular fruit smoothie.

Here's a tip... take any bananas that are getting overripe and you're not going to eat, then just throw them in the freezer. Take one out when you want a thick smoothie. No ice needed. Frozen fruits are great and you can make them yourself. Just cut up, put in the freezer and viola! Fruit as needed.

But last night, I made a fun snack that I had to tell you about. I've been scouring Web sites and books, as well as visiting the recent raw foods meetup in town. I've gotten so many great ideas that I can't wait to try them all out! Last night I sliced up a zucchini with a vegetable peeler to get long, thin ribbons. Then I added some fresh pesto (you can make and freeze that also, it's easy). Add some ground flax seeds for texture and great Omega 3s, then mix it up and there you have it.

One afterthought... I realized that you need to eat it right away. If you want to wait, just salt the zucchini first and let it drain to get some of the moisture out first. There's so much moisture in the zucchini that the sauce begins to get a little watery if you wait too long to eat it. Just salting it will do the trick, and add a little flavor too. Use sea salt for the best flavor. I think I'll do that next time, but the flavor is wonderful either way and the crunchiness is so satisfying.

Enjoy!

Monday, May 25, 2009

Broccoli Salad


I've decided to try and eat as much "live" food as possible, meaning as many raw dishes as I can. I believe it's so much better for you. I recently went to a raw foods meetup and it was so great. I was amazed at the dishes that were all raw. There was even a raw pumpkin pie, which I think was even better than the regular kind. The crust was made of nuts and dates, and the filling was actually butternut squash instead of pumpkin. But I dare you to tell the difference.

One of the great things about eating raw is that you don't have to worry about meat or wheat, in most cases. Some might use soy sauce, but it's clearly marked if it's there. Tonight I decided to try my hand at a broccoli salad. It was awfully yummy and I wish I had made more. I think I'll make some and let it sit overnight, which will soften up the broccoli a bit and blend the flavors. But I'm not complaining, I love the crunchy broccoli, sunflower seeds and sweet tomatoes. Since I just threw this together, the measurements are not as specific as usual. But you get the idea.

Broccoli Salad
About 1 1/2 cups of broccoli florets
1/2 tsp grated raw onion
About 1 TBS sunflower seeds (mine were roasted, but you could use raw)
About 6-8 grape tomatoes, cut in half
1 1/2 tsp ground flax seeds
1-2 TBS honey mustard dressing
1 pinch of sea salt

1. Put all ingredients in a bowl and mix. It's that simple. Add 1 TBS of dressing and mix, then add more to taste.

I like to grate the onion so that the flavor isn't so powerful. I don't like biting into raw onion, but the flavor is great. I just cut off the end of a sweet onion and grated it into the salad. It's about 1/2-1 tsp. It's up to you if you like onion or not, so decide for yourself dear chef. You can even leave it out and it will still be great.

Honey mustard dressing can be a store-bought brand or just a quick mix of honey, mustard, olive oil and salt. This time I was out of honey and used the spray-on brand of honey mustard dressing. It's great if you just want a little dressing at a time, and low cal.

Enjoy!

Friday, May 15, 2009

A New Twist on an Old Classic


After a great visit to New Orleans, it's nice to be home again. I made the spaghetti frittata while I was there, and it was yummy. Everyone ate it all up. There was one piece left the next morning and Daughter and I decided to share it. But we mistakenly took the cocktail sauce instead of the marinara sauce from my sister's fridge and smothered it before noticing. Hmmm, not a great combo. But luckily there wasn't that much left, although I hated not to eat it. I just couldn't.

So now that we're back, Daughter and I are making the most of the Quorn Chicken Tenders. It's basically like the Quorn roast, but small chicken-like chunks. They are wonderful. We found them in the Whole Foods in New Orleans and ate them for lunch twice. Tonight, we decided to try a Shepard's pie with them. What a great idea! For this one, I used cauliflower, baby zucchini and Quorn tenders, topped off with mashed potatoes of course. We had to stop ourselves from eating the whole pie, it was that good. This picture doesn't do it justice. We took a quick shot before devouring it. But trust me, it rocks. Give it a try.

Shepard's Pie with a Quorn Twist
1 tsp olive oil
1/2 bag of Quorn Tenders
1/8 tsp garlic powder
1/8 tsp dried basil
salt/pepper to taste
4-5 baby zucchini, sliced
1 cup chopped cauliflower
2 cups mashed potatoes

This one is easy and quick, but the flavors are so great.
1. Add frozen Quorn to a hot pan with olive oil. Add garlic powder, basil, pinch of salt and pepper to tenders and let them brown slightly.
2. Place zucchini and cauliflower in a separate glass bowl and microwave for about 2 minutes until tender.
3. Add veggies to the tenders in the saute pan and mix.

4. Spray a tart pan with nonstick olive oil spray. Add Quorn mixture to bottom of pan and spread out to cover.
5. Add mashed potatoes on top of Quorn mixture and spread out evenly to the edges. You can use leftover mashed potatoes, make your own, or even use pre-made. For a quick dinner, I don't mind pre-made mashed potatoes.
6. Since everything is already cooked, you really don't need to heat for long. If the potatoes are cold, put into a 375 degree oven for about 30 minutes. You may need to put it on broil for a few minutes to brown up the top. If the potatoes are warm, just place your pie under the broiler for about five minutes to brown up the top.
7. Let it sit for a few minutes to cool, then serve.

Enjoy!

Thursday, April 30, 2009

Going GF w/Karina

I love reading Karina's Kitchen. She's got a wonderful GF blog that I've been reading for a long time. It was so helpful to me when I started this crazy diet. Although she does eat meat, I overlook those recipes and turn toward the wonderful soups and veggie dishes she makes.

This week she's got a great blog on basic GF information. Check it out, it's what we all need to learn when we start a GF diet. Remember, even if something was GF last week, check the package again. Things change, recipes change, and they won't tell you. It's worth the extra time to read the ingredients. And also, cooking your own food is always the best way to go.

I don't know why I can't get the link to work, but you can cut and paste. It's worth the effort.

glutenfreegoddess.blogspot.com/2009/04/gluten-free-cheat-sheet-how-to-go-g.html

Enjoy!

Wednesday, April 29, 2009

Skillet Breakfast for Two


Daughter and I love going out for breakfast, but that can get a little expensive after too many. U.S. Egg in Scottsdale has a great skillet breakfast with potatoes, veggies, cheese and scrambled eggs. This morning I realized I had a baked potato left over and thought, why not make our own? Well, it was awesome, and way better than the restaurant version. Of course, Daughter likes the yellow carrots in the restaurant version, and I had no yellow or orange carrots, so I almost made it perfect in her eyes. Well, can't win them all. It was still great and she ate most of it.

Skillet Breakfast for Two
1 cold baked potato, cut into small chunks
1 cup chopped broccoli
1/2 cup fresh spinach
1 cup chopped mushrooms
1 Tbs olive oil
1 cup cheese (we like a lot, but you could easily do this with half that much)
1 egg
1 eggwhite

1. Put 1/2 the olive oil into a saute pan and cook potatoes until crispy brown. Add a little salt if desired.
2. When potatoes are done, place them on a plate and add the rest of the olive oil to the pan and add the veggies.
3. Stir fry for a few minutes, then cover and cook until broccoli is desired consistency and mushrooms are browned.
4. Add potatoes back into pan with veggies and mix.
5. Whisk egg and eggwhite in a small bowl with salt and pepper.
6. In a separate small pan, scramble egg until desired doneness (as you can see, we like ours well done)
7. Turn off the heat and add 1/3 cheese to the top of the eggs and cover to melt.
8. Add 2/3 cheese to the top of the potato mixture, then add the egg on top. Viola! Breakfast.


This is a photo of the mixture before the cheese and egg. At this point, you could add a little cumin, red pepper flakes and paprika and have a wonderful, spicy breakfast. I just love doing this, but Daughter doesn't like spicy food, so we made the less intimidating version today. Try them both.

Enjoy! This is definitely enough for two people, or even three, but we were very hungry.

Sunday, April 26, 2009

Easy Peasy Asparagus Soup


It's one of those days where I just don't feel like cooking, but I don't want to open a package. Unfortunately, being GF and vegetarian means I can't just make a turkey sandwich, which is what my husband just did.

However, I know how to make soup, and quick soup. I love soup...it's comforting, smooth and yummy. While visiting California Pizza Kitchen recently, I ordered the asparagus soup, creamless and vegetarian, yet smooth with a powerful asparagus flavor. It was grand. So I came up with a simple recipe and here it is, a compilation of things I've learned. I call it easy peasy asparagus soup since it's got peas and asparagus in it. Remember, one pot, simple ingredients, blend...

Easy Peasy Asparagus Soup
1 medium onion, chopped
1 Tbs olive oil
2 bunches of asparagus (about 45 stalks)
1 cup frozen peas
3.5 cups organic veggie broth
salt/pepper

The ingredients are that simple. No kidding.
1. Saute onion in olive oil in a large soup pot until soft and translucent.
2. While onion is cooking, snap ends off of asparagus and cut stalks into 1-inch pieces. Save a few of the tops for garnish.
3. Add asparagus, peas, salt and pepper to onions. Let cook for about 5 minutes to bring up the temperature.
4. Add veggie broth, cover and simmer for about 30 minutes.
5. Check to make sure asparagus is cooked to tender.
6. Blend soup in a blender till smooth. Remember to do this in batches, and start slowly each time blending since the soup is hot and can create steam in the blender.
7. Pour into bowls, garnish with asparagus tops.

You can use any kind of veggies for this, dear chef. Broccoli works great, cauliflower, peas, asparagus (on their own), carrots... the possibilities are endless. Mix and match or let them go solo. Give it a try and your veggies go down real smooth. It's comforting and yummy.

Enjoy!

Tuesday, April 21, 2009

Wonderful Donut Discovery


I'm not sure if these are new, but they are certainly new to me. While shopping at Sprouts, Daughter and I came upon frozen donuts in the freezer case. Kinnikinnick brand, and very tasty.


There were vanilla glazed, chocolate glazed, cinnamon and maple glazed. I bought the cinnamon and took them home. Wonderful! After thawing them out for about 30 minutes, I was in heaven. It was just as I remember old-fashioned cake donuts...chewy, dense and ready to dip in a cup of coffee. Too bad it was after dinner. But in a few days I'll be taking advantage of that.

I highly recommend them.

Enjoy!

Monday, April 20, 2009

Chocolate Mousse Tofu Pie

Ok, take that look off your face. Yes, it's made with tofu, and yes, it's very, very good. Daughter ate two pieces and Husband ate one and the pie is practically gone. It's much better than you tofu newbies would realize. I remember making this for my niece many years ago. She ate the entire thing with her friends without even realizing it was tofu. When I told her, she still didn't believe it. But she did ask for another one...

Of course, it's not the healthiest pie out there. Yes, it's made with tofu, dear chef, but it's also made with chocolate chips and Cool Whip. But if you weigh it all out, it's still a pie with tons of protein, so we won't complain. It's also a pie with lots of taste, trust me. I found the recipe many years ago on a tofu package (Mori-Nu, I believe) and of course modified it to my own way of eating. I didn't change it that much, the original recipe was pretty good, but of course everything has to be modified for those of us going GF. The main change was the crust. Instead of chocolate or graham cracker crust, I made my own using Pamela's cookies and butter. Yum. Try it and see what you think.

This recipe made a lot of pies, I would suggest cutting it in half the first time you make it. I made two mini pies, two small pies and four frozen pops. The bag of cookies was enough for all, although I used some of the ginger snaps for one pie just to change it up a little.

Chocolate Mousse Tofu Pie
1 7 oz. package of Pamela's Extreme Chocolate Mini Cookies (GF)
1/4 cup unsalted butter
Two 16 oz. packages of silken tofu, drained
1 bag of GF chocolate chips
1 tsp GF vanilla extract
1/4 cup agave nectar
1 tub of Cool Whip, thawed
Mini chocolate chips for decoration
A little more Cool Whip to serve with the pie, if you want

1. Grind up cookies in food processor, or place them in a ziplock and pound them.
2. Add about 1/4 cup melted butter to cookie crumbs. Mix thoroughly.
3. Pour crumbs into sprayed pie pans and spread along the bottom and up along the sides as much as possible.
4. Set pie crusts in the freezer while you make the pie.

5. Put tofu in blender and blend until smooth.
6. Melt chocolate in microwave for about 45 - 60 seconds. Stir well.
7. Add melted chocolate, agave and vanilla to tofu and blend.
8. Pour chocolate mixture into pie shells
9. Garnish with mini chips if desired
10. Place in freezer for about an hour.

I like to serve with a little more Cool Whip, but it's really not necessary. I'm just a big fan of Cool Whip (I know, I know, but I still like it.)

These cookies are wonderful. They make a great crust for any pie. I recommend the ginger snaps for a GF cheesecake, yummy. Pamela's also makes a great chocolate chip mini cookie that make a great snack.


Enjoy!

Wednesday, April 15, 2009

Savory Bean and Spinach Soup


While taking advantage of some free time, I sat back and read a magazine. This happened to be the April issue of Fitness magazine. In the very back, I spotted a recipe that looked beautiful. Those magazine photos make food look so good, don't they? Well, I spotted this, realized I had it all in my kitchen already (and more) and jumped up to make dinner. Success...we had it for dinner, breakfast for two days and even gave some to a friend for dinner. It sounds like a lot, but with brown rice and beans, it's filling and wonderful with a salad on the side.

Even though the recipe didn't have cabbage or yellow squash in it, I had those left in the fridge...so in they went. It was great since the cabbage gave it a little crunch and the squash gave the soup a pretty yellow. Try it and add whatever you have in the fridge. I'm sure you've got most of it in the kitchen already.

Savory Bean and Spinach Soup
1 medium onion, diced
2 garlic cloves, chopped
1.5 cups chopped cabbage
1 yellow squash, chopped
1 package (about 2.5 cups) Trader Joe's frozen pre-cooked brown rice (or 1/2 cup uncooked rice)
1 15 oz. can crushed tomatoes
1 15 oz. can great northern beans, drained and rinsed (or any white bean really)
1 tsp dried basil
1 tsp dried parsley
salt and pepper
2 cups frozen spinach (or about 8 cups fresh spinach)
4 cups vegetable broth
Parmesan or Romano for garnish

This is all made in one pot, adding as you go.
1. Saute onion and garlic in large soup pot with 1-2 TBS of olive oil.
2. When onions are translucent, add cabbage, a pinch of salt and cook for another 5 minutes till cabbage is getting translucent.
3. Add chopped squash and saute another few minutes.
4. Add basil, parsley, a little more salt and pepper.
5. Add rice and mix well. If you're using the frozen rice, it will reduce the heat so mix well and cover for a few minutes to bring the heat back up. If you're using uncooked rice, just add it in and mix.
6. Add tomatoes, beans and spinach. Mix well and cover for a few moments to bring up the heat with frozen spinach and wilt fresh spinach.
7. Finally, add broth and enough water to cover by about 1 inch. If you're using frozen or cooked rice, just simmer until everything is hot and blended--about 15 to 20 minutes. If you're using uncooked rice, you'll need to add more water and give it at least 40 minutes to an hour of simmering to cook the rice.

Serve with a garnish of shredded Romano or Parmesan cheese.
Enjoy!

Sunday, April 12, 2009

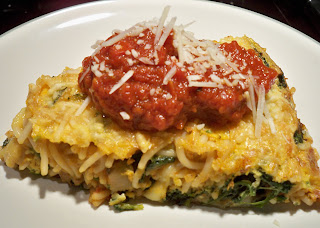
Easter Pasta Frittata


The dew on the plants in the morning was beautiful. That's one good reason for getting up early and taking a walk before the morning has burned off. It was a great morning and many people were out walking and bike riding. But after that beautiful walk, it was time to settle in to the real meaning of Easter--family and chocolate. I love Easter--Any holiday with that much chocolate related to it can't be bad. I love the idea of eating a chocolate bunny, chocolate eggs, etc. And once a year I break down and eat a peep. Just one, head first. I know, it's pure sugar, but sometimes you just gotta' be bad, right? But on to brunch.

Mom came over with a wonderful fruit salad and we chowed down on a great pasta frittata. I saw an episode of Ellie Krieger's cooking show on the food network yesterday and promptly changed this morning's quiche into a frittata with pasta after watching. It looked marvelous. Of course, no recipe can be made without tweaking it to just the way you want it, so some changes were made. Most importantly, GF Trader Joe's pasta instead of spaghetti. I also added mushrooms because anything is better with mushrooms (in my opinion). Of course, my husband had to make a spinach quiche for himself with a pre-made crust. He doesn't like mushrooms and loves a crust. Well, at least it wasn't made in my kitchen from scratch, and that leaves more of the frittata for me, mom and Daughter. Yum.

This is made in two parts--frittata and marinara sauce. Both are easy and quick. For the sake of time, I made the marinara sauce the night before and just heated it up the next morning. But if you choose to do it at the same time, that's also not a problem. And you need to use a pan with a metal handle so it can go right into the oven without melting. If you don't have one, just skip that part and cook a little longer.

Pasta Frittata
Marinara sauce
Olive oil
1 chopped onion
2 large garlic cloves, chopped
1 large can crushed tomatoes
1 tsp dried basil
1 tsp dried parsley
salt
pepper

Frittata
Olive oil
1 large onion, chopped
2 large garlic cloves, chopped
1 cup chopped mushrooms (any kind, I used button)
1 bag fresh spinach, chopped
1/2 bag Trader Joe's Brown Rice spaghetti
3 eggs
4 egg whites
1/2 tsp nutmeg
salt
pepper
1 tsp dried parsley
1 cup cheese (I mixed leftover Jarlsburg Swiss, mozzarella and Romano equaling to 1 cup)

Marinara
1. Cook onion and garlic in olive oil till soft.
2. Add the rest of the ingredients and bring to simmer. Let simmer on low heat for at least 30-45 minutes to let the flavors blend. Set aside.

Frittata
1. Cook pasta according to directions, leaving it very al dente since it will be cooking in the frittata also. When the past is done, rinse with cold water, mix with just about 1/2 cup of the marinara and set aside.
2. Saute onions and garlic in olive oil till soft.
3. Add mushrooms and cook till mushrooms are done, about 10 minutes.
4. Add spinach, piling into the pan. Don't worry, it will cook down tremendously. Let this cook for about 10 minutes until all spinach is wilted. Leave it cooking on very low heat without a lid to cook the moisture out of the spinach.
5. Whisk eggs and eggwhites, along with nutmeg, parsley, salt and pepper.
6. Add pasta to spinach mixture in pan and mix well.
7. Add cheese to spinach/pasta mixture (reserve a little Romano for the top) and mix well.
8. Spread out mixture in pan evenly, then add egg mixture.
9. Let frittata cook over medium heat for about 5-8 minutes until it's just about all set and not wiggly in the middle.
10. Sprinkle remaining Romano over the top, then take the frittata and put it under the broiler on low for about 8 minutes, letting it get brown and toasty on top.
11. Remove and let it cool for about 10 minutes before removing from pan. The entire thing should come out of the pan easily and onto a plate.

Serve with Marinara on top and a little extra Romano. Yum...

Happy Easter...Enjoy!