Showing posts with label cheese. Show all posts

Sunday, August 5, 2012

My GF Pizza Obsession Continues at Detours Tavern

White pizza with kale, broccoli and mushrooms...YUM!
OK, once again we are back on pizza. I know, I know, you're sick of me harping on the GF pizza quest. It's my obsession to find something that comes close to real pizza, as you know. But trust me on this, it's working. Last night, I got closer than I've gotten in a long time.

A dear friend invited me to dinner and said, "I saw gluten free on the menu, so let's go." Of course, that made me nervous, who knows what's there and how they make it, right? But I always figure I can have a salad, and I'm touched that she thought of me and I love that she wanted to go with me.

Cut to a few nights later as we sit in Detours Tavern in Scottsdale. Not too much ambiance, more of a sports bar feel,  but not bad and it is clean. It used to be a Chinese restaurant that was anything but clean. So nice to see that gone at least. I checked the menu and noticed a few things I could order, but then noticed they had pizzas and a little note saying they had gluten-free pizza. Hmmm, after checking with the server, who assured me that they put the gf pizzas on a separate pan to bake and use separate utensils, I ordered a white pizza with kale, mushrooms and broccoli. One word-Wow! Thin, crispy, light, chewy, amazing. And it's huge, not the usual tiny GF pizza that costs a fortune and isn't worth the money. This did cost about $12, but it was totally worth it.

Of course, that meant I had to grill the poor guy for all the particulars. He said they get it from Sysco and he thought it was made in AZ somewhere. The owner wasn't there and he said he'd call me with the information. Of course, I couldn't wait for that so I checked on my phone and found out that Sysco has three GF pizza crusts available- Schar, Ener-G, and Pane Riso/Kingsmill. It didn't look like the Schar crusts, which I've seen before. But all the options have no eggs or gluten, which makes them work for EF/GF Daughter. Yay.
Quinoa salad over raw kale

My friend chose the quinoa salad over kale. It's filled with black beans, corn and more. Yummy! There was a light vinaigrette over the salad and mixed in with the kale, which was raw on the bottom. The quinoa flavor wasn't masked by the dressing, which is sometimes the case with most restaurants. I'm getting this next time, if I can resist not eating another pizza.

And one thing this restaurant does is serve big entrees. We shared both and were stuffed when we were done. You could easily have shared with another person, but I'm sure glad nobody else was there.


I highly recommend this place for a relaxed, casual dining experience. There aren't a ton of GF items on the menu, but what they have looks and tastes wonderful. They have a full bar and flat screens all over, so I'm guessing on game night it's The Place To Be. My friend said their sweet potato fries were wonderful, but unfortunately they are fried in contaminated oil with breaded food. Only bummer of the night.

Monday, July 23, 2012

Gluten-free Quick Taco Bites

Wanting something quick and tasty for dinner? Company drop by and you're stuck? Check your cabinets, you've probably got everything you need.

Gluten-free Taco Bites
1 bag Tostito scoops
1 can black beans
1 cup shredded Mexican cheese
1 container Trader Joe's Mango/Papaya Salsa (any salsa will do, but this is my favorite store-bought)
1/2 tsp garlic powder
1/2 tsp smoked paprika
1 pinch salt

1. Place chips face up on a platter in one layer.
2. Drop a little cheese in each cup and microwave for about 10-20 seconds to just melt the cheese. (covering plate with a paper towel helps the melting to even out.)
3. Heat beans in a small pot with garlic and paprika. Add a little handful of cheese to thicken the beans.
4. Remove chips and drop about 1 tsp of the beans into each cup. Top with a drop of the salsa.

Enjoy!

These are great as appetizers, or do what I did and treat yourself to a plate for dinner.

Sunday, May 20, 2012

Summer Gluten-free Eggplant Pizzas

In the mood for something comforting, but not in the mood for a filling pizza or pasta? I was in the same frame of mind today when I spotted the beautiful eggplants in the market. My daughter was quick to point out that a little sauce and cheese would make a great "pizza" without all the fuss. Love that kid! A quick grill of the eggplant and dinner is served!

Gluten-free Eggplant Pizza

2 med. eggplants, peeled and sliced 1/2 inch thick round slices
1/2 cup marinara sauce (I use Trader Joe's organic)
1/2 cup shredded mozzarella (or whatever cheese you like)
4-5 large fresh basil leaves, chopped
1 tsp dried parsley
salt/pepper/garlic powder

1. Grill sliced eggplant with a bit of olive oil and salt until softening and grill marks show, but be careful not to let it get too soft. It's going in the oven for a few minutes, so don't overcook.

2. Place the eggplant slices on a cookie sheet. Top with a 1-2 teaspoons of marinara sauce and a bit of shredded cheese.

3. Sprinkle salt/pepper, basil, parsley and garlic powder.

4. Place pan under low broil until cheese is melted. Watch closely, you only need a few minutes.

Voila! These are tasty and so yummy. I don't miss the crust at all. If you want to do the entire meal on the grill, just layer the slices on a sheet pan, put it back on the grill and close the door for a few moments to melt the cheese. That quick and no need to fire up the grill in the summer.


Thursday, February 2, 2012

Gluten-Free Pizza Crust Experiment #4

Pizza Crust No. 4 is a Winner
If you've been following the blog, you already know that I'm on a quest to find the easiest, tastiest pizza crust to make at home. Yes, I know I can buy a frozen one quite easily, but aside from the astronomical costs of these things (I took out a home equity loan for a GF pizza party), I think the flavors are just not right. Either they taste like cardboard or they are overly seasoned to cover up the bean-flour taste. There has to be something out there, right?

So, continuing the quest with #4, I decided to find out if a simple, quick crust can be made. This time I had no recipe (yes, I threw away the bag already) and just went with it. I had one cup of Bob's Red Mill Pizza Crust mix in a bag from a previous attempt that was just begging to be used. (I know I used this mix in a previous test, but it was mixed with another flour and I wanted to try it on its own.) The rest was improv, and wow, it's in the top 2. This crust is light and crispy around the edges, slightly chewy toward the middle and has a mild taste. Daughter said it tasted better than numbers 1 and 3 and I have to agree. I think this one is my favorite for two reasons: It is the easiest by far and it has the most basic pizza crust flavor. I can see adding all kinds of toppings and it would work with all of them. You could even bake it with cheese first, then top it off with whatever you like. This made a large 10-inch round pizza with eight nice-sized pieces. It could feed two to three hungry people easily. This makes it the most cost effective also since there are at least three-four cups of mix in each bag.

Quick, Easy Pizza Crust
1 cup Bob's Red Mill Pizza Crust Mix
1 egg
1/4 cup milk
1 TBS olive oil
1 tsp baking powder
pinch of salt/oregano/basil/pepper

1. Preheat oven to 400 degrees.
2. Add all ingredients in a large bowl and mix until blended well. Use a fork, it will get very thick. Knead it a little with your hands to smooth it out a bit.
3. Turn out onto a greased cookie sheet and spread it out with your fingers.
4. Cover the dough with wax paper and roll out to a pizza-crust thickness (about 1/4 inch). Don't forget to create a bit of a crust edge with your fingers.
5. Bake for 10 minutes.
6. Cover with marinara, cheese, etc. and put back in the oven for 10 minutes.

The big difference in this recipe is that I did not use the yeast packet that came with the mix and instead added the baking powder. I have used yeast in two of the four crusts and aside from the fact that neither one has risen much, I'm not sure it adds much to the mix and I don't like the flavor. The recipe also calls for water but I had a little bit of milk left and decided to give it a go. That was also a good choice. Daughter asked me to make this one again for dinner so I'm checking this one off as a keeper.

Next time, I'll do this one with added Parmesan in the crust for flavor and a bit more saltiness.

Enjoy!

Tuesday, January 24, 2012

The Continued Quest for Pizza Perfection #2


The pizza quest continued last night with a valiant effort to make an even better pizza crust. Success and at such an early stage, I may just let this go to my head.

Comments from the two teens who were taste testing were: "This is awesome," (this one included a high-five), "This is better than the one you buy at the store," and my favorite was, "You should definitely make this one again."

Very wet pizza dough
This gluten-free crust is brought to you by King Arthur Flour, which is also nut free and soy free (and Kosher). I used the pizza crust picture here, and of course I felt the need to doctor it up a little. (You know I can't resist, dear chef.)

In short, just use the directions on the back of the box (eggs, oil, yeast, warm water). I added a tiny bit of cider vinegar (1 TBS), 1 tsp each of salt, garlic powder, dried basil and dried oregano.

Directions on the box allow for it to rise once in a bowl for 30 minutes, then once again after you spread it out on the pan. Hint: This is more very thick cake batter rather than pizza dough. It doesn't spread well unless you put some olive oil on top and spread it out with a spatula. Don't even try to roll it out, you'd be wasting your time. But don't let this scare you. I was a bit nervous at first, but it turns out just fine. As you can see in my photo, it's a pretty wet mixture. And although it said to let it rise 30 minutes, it didn't rise at all after this. Don't know what I did wrong, or if the yeast was old, or maybe it wasn't warm enough in the kitchen. Who knows.

Bake the crust first, then top it and bake again for about 10 minutes, just enough to melt the cheese and warm whatever you want on it. For this experiment, all pizzas have just marinara and mozzarella. We're trying to keep the playing field even. (As much as possible.)

The result is a chewy crust with a light flavor. It's firm enough to hold in one hand and eat like a slice of pizza, which was a pleasant surprise judging by the state of it before it was baked. It was much better than the biscuit crust from the prior night, although that was still very good. This had more of a pizza-crust texture. I was disappointed that it didn't rise more and I think it would have been even better if it did. I'll be making it again and hoping for a better rise. Could just be the cold, dry Arizona desert.

Give it a try and let me know how it goes. Let me know here, or head over to the FB page.
Enjoy!

Sunday, January 22, 2012

A Quest for Pizza Perfection

Pizza Crust at the last minute
I started my quest for at-home pizza dough tonight. Since I didn't feel like heading out to the store, I decided to improvise with what I had in the cupboards and fridge. Crazy? Well, not really. In a happy twist of fate, I actually did pretty well. I'll be tweaking this recipe in the future, but if you're looking for a quick, easy, tasty pizza crust, this could be it.

The crust is firm enough to pick up, a bit more like a biscuit in texture (thanks to the Bisquick I'm sure) but still has a pizza crust taste. I added salt and a bit of dried basil to the crust for more taste. You can choose to or not, depending on your taste.

Pizza Crust #1
1 cup Gluten-free Bisquick Mix
1 cup sweet rice flour
1/4 cup almond flour
2 tsp baking powder
1/4 cup Parmesan cheese, grated
Pinch of dried basil

2 medium eggs
1/2 cup milk
3 tbs olive oil

salt/pepper/oregano/basil/parsley

1. Preheat oven to 500 degrees (I know, just trust me)
2. Mix the first five ingredients
3. Crack two eggs in a measuring cup and mix. Add enough milk to make 1 cup of liquid total.
4. Pour into dry mixture, along with olive oil and spices.
5. Mix dough and let sit for a moment.
6. Spread dough on greased cookie sheet. I used a piece of parchment over the dough to roll it out flat.
7. Pinch a rim around the dough and spread a little olive oil over top of the dough.
8. Bake in the 500-degree oven for 10 minutes.
9. Remove from oven, turn oven down to 350 degrees and top with your favorite toppings. We used tomato sauce and mozzarella for our first try.
10. Return to oven for 10 minutes, or until cheese is melted.

Hint: depending on how dry it is in your neck of the woods, you may want to add a little more liquid to the mix. It should be like dough but stickier.

I'm on a quest to find the best at-home pizza crust and I think I'm starting out pretty well. I'll fall back on this one when all else fails because I know it's good. The ultimate test is the Teen Daughter, who ate two pieces and told me to save the rest for breakfast tomorrow. That's a very good sign!

Let me know what you think or what you've used in the past.

Thursday, January 12, 2012

Scottsdale's 5th and Wine warms my GF heart

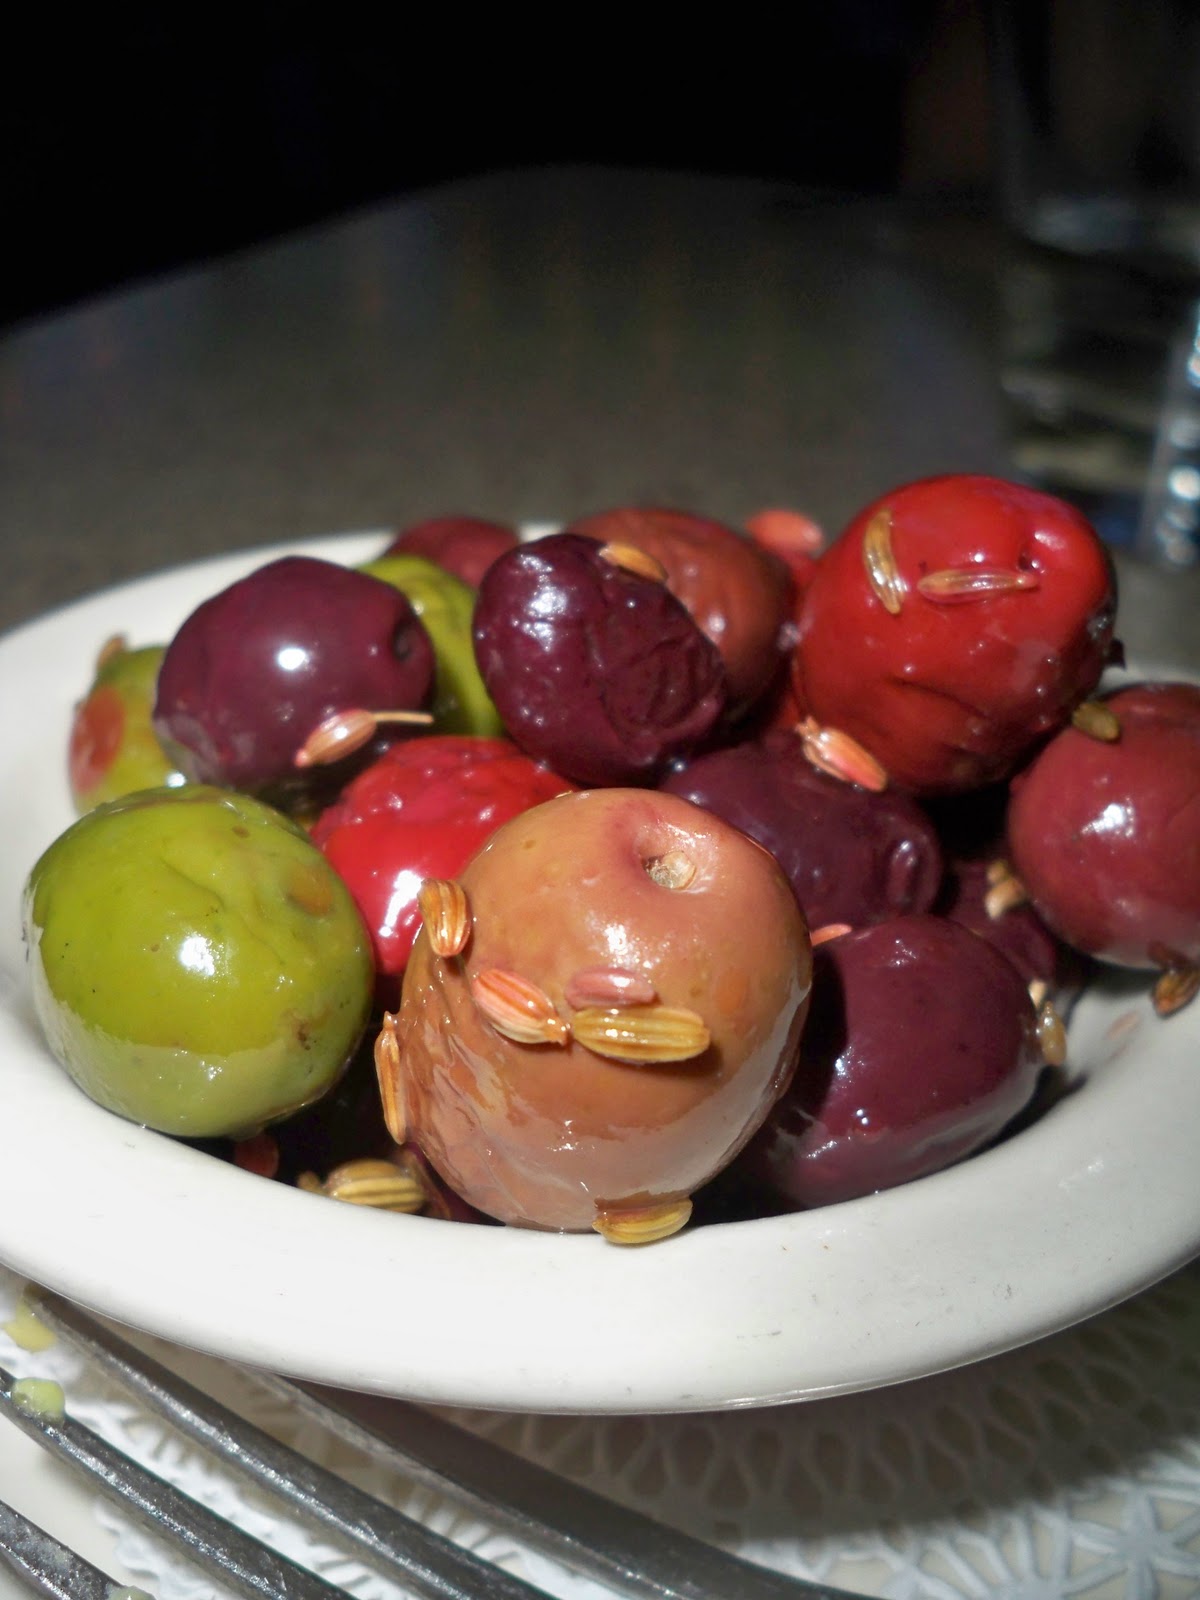
One of my favorite places in the heart of downtown Scottsdale has to be 5th and Wine, a restaurant/wine bar with a comfortable atmosphere and a GF/vegetarian salad I keep coming back for again and again. Not only do they have an extensive wine list, there is a lovely patio in the heart of the arts district with live music and comfy seats that create the perfect conversation areas. Inside there are soft, leather cushy chairs just meant for chatting and relaxing over a glass of wine and house-marinated olives.

5th and Wine's Yummy Veggie Salad
First on the menu is the Veggie salad filled with avocado, white and green beans, grape tomatoes, jicama, and mozzarella tossed with a light herb vinaigrette. The dressing doesn't overpower the salad, which is light, fresh and filling. You can even order half a salad if you're not that hungry, but trust me, you'll want more.

The Strawberry and Gorgonzola salad is also beautiful. I tend to order it with goat cheese instead of Gorgonzola, but that's just my preference. It's still wonderful and sweet.
Roasted marinated olives
If you're just having a glass of wine (happy hour is just $5 a glass til 6 and watch for occasional $2 days), order the house marinated roasted olives with orange peel, fennel and red pepper flakes. Oh, yum. I've been known to just eat the olives while everyone else around ate burgers. I didn't feel deprived at all, they are that good.

The menu also has burgers, salads, fries and even fried pickles for the non-GF eaters in your group, which makes my husband very happy. I've been brave enough to eat the salad and olives only. Since I'm not a meat eater, that leaves few options in these trendy downtown eateries most of the time, luckily I'm a salad lover and finding a great salad I can go back to again and again is a great thing. Thank goodness 5th and Wine has created a salad and olives I'm in love with.

The wine list is superb and if you're not sure about what you want, just ask. They are knowledgeable and I haven't been steered wrong yet. I prefer a nice white wine blend with this salad and each time I get something a little different.

Of course, if it's an intimate conversation, take it outside if weather permits (which it does most of the year here in Phoenix). It can get quite noisy inside when it gets crowded. Walk the shops in the area and stop in for a glass of wine and a salad, you won't be disappointed.

(By the way, I'm not affiliated with the restaurant and receive nothing for this review. Just sayin')

Friday, December 2, 2011

Here's how to have a gluten-free book club tea party

It was my month to choose a book and host book club in November. Not only do I love reading, but I also love hosting parties. The book I chose was Remarkable Creatures, by Tracy Chevalier. And since the book is based on the lives of spinster women searching for fossils on the coast of England in the early 1800s, (yes, it really is), I chose a tea-party theme with seashells and dinosaurs thrown in for fun.
Tea Party with sea glass, shells and dinosaurs
Tea is served

First let me note that I am the only GF eater in the group. It's been my mission to prove to them all that GF cooking is just as good and that the wheat is not missed. Top that with the fact that we're vegetarians and there isn't any meat at our house and I've got a real challenge, but I'm always up for a challenge, Dear Chef.
The dinosaur is there for a reason, trust me.

I decided on making two veggie tarts, (basically quiche without the crust). The first was made with carmelized leeks, browned mushrooms, mozzarella and goat cheese. Carmelize one onion and two leeks, then add mushrooms and brown them with the onions. When they're done, place them on the bottom of a tart pan and spread out evenly. Cover with a layer of shredded mozzarella and about 3 TBS of shredded Parmesan. Sprinkle with chopped fresh thyme and parsley. In a separate bowl, mix together about 4 egg whites and 3 eggs. Add about 1/4 cup of goat cheese and whisk it all together with a pinch of salt, pepper, garlic powder, dried mustard and nutmeg. Pour evenly over the tart and bake in a 350 oven for about 30 minutes. Don't let it get too brown. Slice when cool and enjoy. I'm always apprehensive about using goat cheese since even though I love it, I have found that people either love it or hate it. But this was first plate to be empty, so I suppose this wasn't anything to worry about.
Another dinosaur, representing the fossils in the book.

The second tart was onion, spinach, asparagus and Swiss cheese. Start with the onions in a bit of olive oil and butter (as above) and cook till brown and sweet. Add about 2 cups of fresh spinach and cook until wilted. Turn the heat on low and cook for about 10 minutes until the liquid has cooked out of the spinach. Add 1/2 tsp fresh garlic, pinch of salt and pepper. spread evenly into a pie/tart pan. Cover with 1 1/2 cups of shredded Swiss cheese. Take asparagus and arrange in a patter on top of the cheese. In a separate bowl, beat together 4 egg whites, 3 eggs, 1/4 cup half and half, salt, pepper, pinch of both nutmeg and dried mustard. Chop about 1 TBS fresh parsley and add to the mixture. Beat and then pour evenly and gently over the veggie/cheese mixture. Bake at 350 for about 25 minutes, but don't let it get too brown. Slice when cool.

Thanks to Udi's for the fabulous bread used to make the cucumber sandwiches and the egg salad sandwiches. They were the first to go and not one was left on the plate. Daughter and I kept eating them while making them, we love them that much. Simple to make, really. For the cucumber sandwiches, just cut the crusts off the bread, then spread with cream cheese and layer with strips of cucumber (use a veggie peeler for strips) and slice. Sprinkle with a little salt and a bit of chopped fresh parsley. For the egg salad I used chopped egg, mayo, apples, celery, salt/pepper and chopped parsley. I didn't cut the crusts off of these and they were yummy .


In keeping with the fossil-hunting theme, Daughter actually made a wonderful GF coffee cake and placed a small dinosaur in one of the pieces while plating the cake. (Fossil hunting in the dirt? Too much of a stretch?) The cake was gone quickly, and worked perfectly with the tea after dinner.


And believe it or not, I found the perfect wine in the spirit of the fossil-hunting theme of the evening. Thanks Trader Joe's.


I was depending on Trader Joe's for their lovely shell-shaped chocolates to round out the decor. And wouldn't you know it, they don't have them yet for the holiday season. What's a girl to do? Ask her teen to make some chocolate, that's what. Darling daughter actually melted white and dark chocolate and poured it into molds to give us our shell chocolate. What a doll! The night was rounded out with cheese/pesto/sun-dried tomato torte with rice crackers, caramels with sea salt and a lovely salad of spring lettuce, roasted beets and candied pecans in a balsamic dressing.

I'm sad the night is over, but I can't wait for next month. Try reading the book and see what it inspires you to cook. Enjoy!

Wednesday, March 30, 2011

The ultimate comfort food... Gluten-free Mac & Cheese

GF Mac & Cheese (better than my mom's...Shhhh)
Wow, I am so good! Seriously... Since going GF about 6 years ago, I haven't had a good mac & cheese. I've had frozen mac & cheese, and that yucky one in the box. I gave up after trying to doctor them and coming up with a goopy, yucky mess. But that doesn't mean that my need for comfort food is gone (can't you tell by the enchilada pie the other day?)

I have seen many, many recipes for this timeless comfort food on the Internet and they all look good. Truth is, I'm sure they are all good. But I wanted mine to be awesome! Instead of using flour to thicken the cheese sauce, the top three options out there are GF flour mix, corn starch and rice flour. I chose to go with some sweet rice flour I have in the cabinet, which I normally use for GF crepes. I also just grabbed all the different kinds of cheese in the fridge, so don't get nervous about that. Make sure you put some cheddar in there, then switch it up and use whatever looks good to you. The main point is to have a gooey, cheesy cream sauce that bakes into a wonderful dish that brings back comfort memories. OK, this is better actually than mom used to make, but I'll deny it if anyone tells her that (sorry Mom!)

The rest is simple...pasta, cheese, butter, milk, bake, viola! Give it a try and I guarantee you'll fool those G-Eaters out there. My husband ate two plates full and said he'd eat this over any gluten mac & cheese out there. Score!

GF Mac & Cheese 
2 1/2 cups GF pasta (I used DeBole's corn elbows)
1/2 stick butter
2 Tbs Sweet Rice Flour
2 cups milk
1 tsp salt
1 tsp dried mustard
1 tsp nutmeg
1/2 tsp ground black pepper
2 cups shredded Mexican cheese
1/2 cup chopped cheese cubes (I had Jarlsburg and Cheddar left and chopped it up)

1. Preheat oven to 350 degrees.
2. Cook pasta with plenty of water and salt. Take it out while just under al dente since it will cook some more in the oven.
3. While pasta cooks, melt butter in a pan. Add flour and whisk till mixed well. Then add milk slowly and keep mixing till blended well and bubbly. Let it simmer while stirring and thickening. It should be about as thick as a good thick gravy. If it isn't, go ahead and add a little more rice flour or milk, depending on which way you need to go.
4. Add the cheese and mix till all the cheese is melted.
5. Add drained pasta to cheese mixture and blend.
6. Pour pasta mixture into a greased 8x8 glass baking dish.
7, Sprinkle with a handful of shredded cheese (optional) and bake for 30 minutes.
8. Let it sit for about 10 minutes before serving (if you can wait that long).
I love the way it looks when it comes out of the oven...yum!

Enjoy!

Thursday, September 9, 2010

Spaghetti Squash Casserole

Spaghetti Squash Casserole
With the inspiration of True Food's spaghetti squash special, and the need for a potluck dish tomorrow, I came up with what turned out to be a fabulous dinner! It's low carb, delish and easy. Just the way I like it!

I've cut the recipe in half since I made this for a ton of people, and made a small one for us tonight. Feel free to double it and bring it along to a potluck, you'll be popular for sure.

Spaghetti Squash Casserole
1 spaghetti squash (about 4 lbs)
2 tsp olive oil
1/2 sweet onion, chopped
1 medium yellow squash, diced
2 medium zucchini, diced
16 oz. crushed tomatoes
2 Tbs tomato paste
garlic powder, salt/pepper, dried parsley
1/4 cup grated Parmesan cheese
1/2 cup shredded mozzarella cheese

1. Preheat oven to 400 degrees.

2. Cut spaghetti squash in half (or get someone strong to do it since it's a tough job) and remove the seeds and fibers from the middle. Place them face down on a cookie sheet that's been sprayed with olive oil spray. Spray the tops of the squash and bake for about 30-40 minutes. You'll know it's done when you stick a fork through the skin and it's soft.

3. While the squash is baking, use a saute pan and saute onions in olive oil. Add a little salt and saute till translucent.

4. Add yellow and zucchini squash to onions and saute until liquid is gone and zucchini is soft. Add a little salt/pepper and about a pinch of parsley.

5. Mix crushed tomatoes, tomato paste, garlic powder, salt/pepper and dried parsley to taste and let it simmer for about 30 minutes.

6. When spaghetti squash is done, take them out and let them cool for a bit. Turn the oven down to 350 degrees.

7. Using a fork, shred the squash until it's all loose. Pour it all into a glass baking dish (about 9x9)

8. Add veggies, 1/2 the Parmesan and about 2 cups marinara sauce and mix. Taste and season if it needs more salt/pepper.

9. Spread it out evenly in the dish, top with the remaining Parmesan and Mozzarella.

10. Bake for 25 minutes or until cheese is golden brown on top. Let it cool for a few minutes to set up.

You can make this ahead, assemble and refrigerate and just bake the next day. I'm assuming it would freeze well also, I just haven't tried that yet. Just remember to bake it longer since it's cold.

Enjoy!

Wednesday, April 29, 2009

Skillet Breakfast for Two


Daughter and I love going out for breakfast, but that can get a little expensive after too many. U.S. Egg in Scottsdale has a great skillet breakfast with potatoes, veggies, cheese and scrambled eggs. This morning I realized I had a baked potato left over and thought, why not make our own? Well, it was awesome, and way better than the restaurant version. Of course, Daughter likes the yellow carrots in the restaurant version, and I had no yellow or orange carrots, so I almost made it perfect in her eyes. Well, can't win them all. It was still great and she ate most of it.

Skillet Breakfast for Two
1 cold baked potato, cut into small chunks
1 cup chopped broccoli
1/2 cup fresh spinach
1 cup chopped mushrooms
1 Tbs olive oil
1 cup cheese (we like a lot, but you could easily do this with half that much)
1 egg
1 eggwhite

1. Put 1/2 the olive oil into a saute pan and cook potatoes until crispy brown. Add a little salt if desired.
2. When potatoes are done, place them on a plate and add the rest of the olive oil to the pan and add the veggies.
3. Stir fry for a few minutes, then cover and cook until broccoli is desired consistency and mushrooms are browned.
4. Add potatoes back into pan with veggies and mix.
5. Whisk egg and eggwhite in a small bowl with salt and pepper.
6. In a separate small pan, scramble egg until desired doneness (as you can see, we like ours well done)
7. Turn off the heat and add 1/3 cheese to the top of the eggs and cover to melt.
8. Add 2/3 cheese to the top of the potato mixture, then add the egg on top. Viola! Breakfast.


This is a photo of the mixture before the cheese and egg. At this point, you could add a little cumin, red pepper flakes and paprika and have a wonderful, spicy breakfast. I just love doing this, but Daughter doesn't like spicy food, so we made the less intimidating version today. Try them both.

Enjoy! This is definitely enough for two people, or even three, but we were very hungry.

Tuesday, October 21, 2008

Tofu Parmigiana


I've been missing eggplant parmigiana for awhile now. I know I can make it without the breading and it's still pretty good, but it's just not there. Being a vegetarian, I can't just use chicken, etc. so that leaves a dilemma I have finally solved. What about using tofu? Yes, I know you're going to say that I use tofu in everything, and I probably do. But luckily, I love it! And there are so many ways to use and enjoy it. And using the very firm tofu products gives it a great "meaty" texture.

This meal was something I decided to try since I had everything in the fridge, what the heck. Daughter and I scarfed it up last night and made it again for lunch today, so you know it was a hit. We spent the afternoon on a simulated archeological dig, then came home and set to cooking a feast in 10 minutes. What fun, I love homeschooling!

Tofu Parmigiana
It all depends on how much you want to make, but it's just so easy. I use Wild Wood High-protein, super-firm tofu that I found at WholeFoods. It has a great flavor and crisps up great in the pan.

Slice the tofu into 1/4-inch squares and dust with a mixture of sweet rice flour, garlic powder, salt and dried basil. I put just a pinch of each, but use whatever you desire for flavor. After coating both sides, drop gently into a hot pan with olive oil. Fry each side on medium heat until brown on each side. Then just spoon tomato sauce (we used leftover sauce, but any sauce will do) over the top of all the squares. Now top those with slices of fresh mozzarella and a little more basil. (I love fresh mozzarella from Trader Joe's.) Turn the heat off and cover the pan for just a moment so the cheese melts. Viola--all done. Quick and tasty.

Enjoy.

Saturday, August 30, 2008

Quick But Yummy Breakfast


We had an incredible storm the other night here in Phoenix, and we were without power for about 15 hours. I know this photo doesn't do the storm much justice. Daughter took it as we sat on the patio watching the storm pass over. I was afraid to open the fridge or freezer for fear of thawing everything out, and we ended up eating out as much as possible. I suppose we were lucky since some people are still without power and there were downed trees in their yard, or powerlines went down like dominoes. We didn't have any water damage, or wind, just the lack of power that made it pretty uncomfortable to sleep. As my sister awaits Gustov in New Orleans, I suppose I shouldn't complain.

Now that the power is back on and the plants are drying out, I'm starved. I couldn't decide what to eat for breakfast this morning, and didn't want to pull out pans and such. And even though I just love my old standby... Rice Chex with rice milk, I just wasn't in the mood.

I looked in the fridge and viola! breakfast was there. Just a little bit of both Fontina and goat cheese left over from a quiche for book club, and one Roma tomato. I just bought a loaf of GF sandwich bread from Gluten Free Creations, a local GF bakery.

I toasted the bread, placed sliced fontina on each slice (just enough for both left, yipee) and a little goat cheese. Putting the cheese immediately on the toasted bread lets it melt just so slightly, but not completely. Then top with slices of tomato. I added a little Kosher salt and fresh ground pepper and there you have it. The Fontina and goat cheese give a great, salty texture and the tomato had a ripe, fruity flavor. I grabbed a few fresh basil leaves from the bush in the back yard, which added to the already wonderful flavors. The bread was toasted just enough to give a great crunch. Yum... what a great way to start the day.

BTW, what did Daughter eat, you may be asking? A chewy, yummy bagel from Einstein's with cream cheese. She loves to torture me with things I can no longer enjoy, but this time I know mine was much better and I didn't even want the bagel. Things are looking up!

Enjoy!