Wednesday, March 30, 2011

The ultimate comfort food... Gluten-free Mac & Cheese

GF Mac & Cheese (better than my mom's...Shhhh)
Wow, I am so good! Seriously... Since going GF about 6 years ago, I haven't had a good mac & cheese. I've had frozen mac & cheese, and that yucky one in the box. I gave up after trying to doctor them and coming up with a goopy, yucky mess. But that doesn't mean that my need for comfort food is gone (can't you tell by the enchilada pie the other day?)

I have seen many, many recipes for this timeless comfort food on the Internet and they all look good. Truth is, I'm sure they are all good. But I wanted mine to be awesome! Instead of using flour to thicken the cheese sauce, the top three options out there are GF flour mix, corn starch and rice flour. I chose to go with some sweet rice flour I have in the cabinet, which I normally use for GF crepes. I also just grabbed all the different kinds of cheese in the fridge, so don't get nervous about that. Make sure you put some cheddar in there, then switch it up and use whatever looks good to you. The main point is to have a gooey, cheesy cream sauce that bakes into a wonderful dish that brings back comfort memories. OK, this is better actually than mom used to make, but I'll deny it if anyone tells her that (sorry Mom!)

The rest is simple...pasta, cheese, butter, milk, bake, viola! Give it a try and I guarantee you'll fool those G-Eaters out there. My husband ate two plates full and said he'd eat this over any gluten mac & cheese out there. Score!

GF Mac & Cheese 
2 1/2 cups GF pasta (I used DeBole's corn elbows)
1/2 stick butter
2 Tbs Sweet Rice Flour
2 cups milk
1 tsp salt
1 tsp dried mustard
1 tsp nutmeg
1/2 tsp ground black pepper
2 cups shredded Mexican cheese
1/2 cup chopped cheese cubes (I had Jarlsburg and Cheddar left and chopped it up)

1. Preheat oven to 350 degrees.
2. Cook pasta with plenty of water and salt. Take it out while just under al dente since it will cook some more in the oven.
3. While pasta cooks, melt butter in a pan. Add flour and whisk till mixed well. Then add milk slowly and keep mixing till blended well and bubbly. Let it simmer while stirring and thickening. It should be about as thick as a good thick gravy. If it isn't, go ahead and add a little more rice flour or milk, depending on which way you need to go.
4. Add the cheese and mix till all the cheese is melted.
5. Add drained pasta to cheese mixture and blend.
6. Pour pasta mixture into a greased 8x8 glass baking dish.
7, Sprinkle with a handful of shredded cheese (optional) and bake for 30 minutes.
8. Let it sit for about 10 minutes before serving (if you can wait that long).
I love the way it looks when it comes out of the oven...yum!

Enjoy!

Monday, March 28, 2011

Amazing Enchilada Pie

Gluten-free, Vegetarian Enchilada Pie
Since most enchilada sauce is made with flour to thicken it, I had mostly just given up on eating and making enchiladas. I thought the sauce was the most important part of the dish, right? Even canned sauce is suspect since I had a bad reaction once. But those days are over! I searched on the Internet to find out how to make my own enchilada sauce. Turns out, it's not that hard. Using corn starch to thicken it makes it gluten free and adding the spices you want keeps it just as spicy as you like it. I read about 10 different recipes calling for all kinds of spices, flour, corn starch, etc. and decided to create my own...And after attempting to roll the tortillas, I gave up and decided it was easier to make this a layered pie instead. Still tasty and much easier, but if you feel like rolling, go for it.

I decided to fill it with veggie goodness since cheese enchiladas seems to be just a little overkill...but don't get me wrong. I still love cheese as you can see from the photo. There's plenty of cheese in there and if you're rocking this vegan, just use your favorite soy/rice cheese in place of the cheese I've used. Still yummy!

Amazing Enchilada Pie
Sauce
1 28 oz. can diced tomatoes (I used Trader Joe's)
1 6 oz. can of tomato paste (I used Trader Joe's)
About a tsp of each of the following, then keep tasting and tweaking till it meets your tastes
  salt, pepper, garlic powder, dried epizote, dried parsley
(if you don't have epizote, you can skip it. I just happen to have it as a gift from a friend)
2 tsp each cumin and chili powder
1 cup water
2 TBS corn starch

Enchiladas
1 doz. corn tortillas
1 sweet onion, chopped finely
2 cups frozen roasted corn (Trader Joe's)
2 cans black beans
1 1/2 cups frozen spinach
1 tsp garlic powder
1 tsp cumin
1 tsp ground pepper
2 cups grated Mexican cheese
olive oil

1. Preheat oven to 375 and spray a glass pie dish. This recipe actually made three pies, so cut it in half if you don't need that much. Remember you can freeze them.
2. In a large pot, combine diced tomatoes (don't drain), tomato paste, 1/2 cup water and spices. Stir until mixed and let simmer while you make the enchilada filling.
3. To make the filling, use a large skillet and add the onion in some olive oil and cook until tender. Add a pinch of salt to the onion.
4. When the onion is soft, add the corn, black beans, spinach and spices. Mix and let it simmer for about 15 minutes to blend the flavors.
5. Use an immersion blender and blend the sauce until smooth. (you can use a blender if you don't have an immersion blender, but be careful since this is hot)
6. Mix corn starch with 1/2 cup of water and mix until corn starch is dissolved. Add it slowly to the sauce while stirring
7. Now it's time to layer the pies. On the bottom of the glass baking dish, spoon enough sauce to just cover the bottom. Layer with tortillas by ripping up the tortillas if needed to make one layer. Spoon the bean/corn mixture evenly over the tortillas (about a cup), then cover with a sprinkling of cheese.
8. Repeat with another layer of tortillas, veggie mixture and cheese.
9. Top off the pie with another layer of tortillas, then spoon about a cup of sauce to cover the top. Make sure no tortilla is left uncovered since it will get hard and burn in the oven. Cover this layer with cheese.
9. Repeat in the remaining baking dishes.
10. Bake for 30 minutes. Remove and let them sit for about 10 minutes before serving.

This is the cheesy goodness that came out of the oven! Yum!


This recipe made just enough sauce for the three baking dishes. Next time, I may double the sauce recipe to have a little extra. Other than that, these are the best I've ever made, or eaten. Even my husband said the sauce and enchiladas were better than any restaurant. High praise!

Enjoy!

Friday, March 25, 2011

My Daughter's Awesome Coffee Cake

Gluten-free Coffee Cake
Gluten Free Pantry used to have a coffee cake mix. Remember those? I made one for Christmas in Dec. 2009, and it was so very good. Well, they must have stopped making it since I haven't found it again. I've been craving coffee cake ever since, but too lazy to figure out my own recipe.

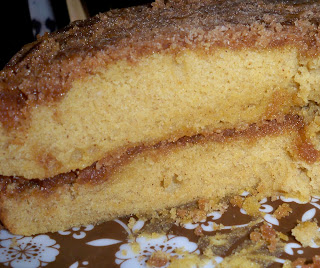
Thank goodness my daughter has inherited my love of cooking and experimenting. As a special treat, she decided to give it a try and used the Gluten Free Pantry Yellow Cake Mix and came up with a wonderful coffee cake that was gluten-free, quick and easy...and totally delicious. I needed a lot of self control not to eat it all that night and actually saved some for the morning to go with my coffee. It has a lovely cinnamon/sugar crunchy mixture on top and in the middle, kind of like a layer cake. Give it a try and tweak it however you like. You can add nuts if you like (like we did a few years ago). We're not big nut fans over here so we don't put nuts in our cakes, usually. But if you like them, I'll bet a few walnuts or pecans would be great!

Julie's Awesome Coffee Cake
1 box Gluten Free Pantry Yellow Cake mix
4 medium eggs or 3 extra large eggs
1 Tbs vanilla
4 tsp cinnamon
1 tsp salt
1/4 cup brown sugar
2 Tbs sugar
1 stick butter + 4 Tbs butter

1. Preheat oven to 350.
2. In a large bowl, mix the box of cake mix (keeping out 2 Tbs) into a bowl with the eggs, vanilla, 2 tsp cinnamon, and 1 stick of butter, melted, and salt.
3. Mix until blended and set aside.
4. In a small bowl, add 2 tsp cinnamon, brown sugar, white sugar, 2 Tbs of the cake mix you saved and 4 Tbs of cold butter until crumbly.
5. Spray 2 9-inch layer pans.
6. Pour cake mix evenly into both pans and and top each with half of the cinnamon/sugar mixture.
7. Bake for about 20 minutes, checking to be sure that a toothpick comes out clean.
8. Let them cool for 15 minutes before removing from the pan. Then stack them to make a layer cake, or just serve one and freeze the other, which is my plan for the next one. I wish there were more, but it's all gone.

Enjoy!

Monday, March 7, 2011

Quick Grilled Veggie Salad

What if you could whip up a fabulous salad in just a few minutes? Not that hard, you say. But what if that salad had grilled veggies, baby beets and homemade honey/mustard salad dressing? Ah, now I've got your attention!
Trader Joe's Marinated Grilled Eggplant and Zucchini

I found these grilled veggies in the frozen section of Trader Joe's. I bought them on a whim, thinking I could do so many things with them. Same with the beets. I love beets in salads and there are enough in this small package for a few salads. When I realized I was going to a friend's and needed to bring a salad, I realized how it would all come together.

Quick Grilled Veggie Salad

2 cups butter lettuce, chopped
2 cups spring greens, chopped
2-3 baby beets, cooked and chopped (I used Trader Joe's baby beets)
7-8 slices of grilled veggies, chopped (I used Trader Joe's marinated eggplant and zucchini, but you can grill your own)
1/2 cup sliced cherry tomatoes
Honey/mustard salad dressing (see below)
1 Tbs fresh parsley, chopped

1. Pulled the veggies out of the freezer and place them on some foil covering a cookie sheet. Since they are already grilled in olive oil and spices, nothing else is needed. Just turn on the broiler and prepare the rest of the salad while they cook, turning them once for even cooking. This takes only about 5-7 minutes.

Trader Joe's Baby Beets
2. Make the dressing in a small food processor. Add the juice of one lemon and 1/2 an orange. Add 1 Tsp Dijon mustard, 2 Tbs olive oil, 1 Tbs honey, and a pinch of salt/garlic powder/pepper/dried parsley. Whiz in the processor and taste. Add more of anything to make it to your liking. I like a little more mustard and honey in mine, but just keep messing with it till it's just right.

3. Add lettuce, tomatoes, beets and parsley and toss the salad.

4. Remove veggies from the oven and chop.

5. Just before serving, mix in the veggies and the dressing to the salad and toss. Don't add all the dressing, just add a few tablespoons and toss, then add more as needed.

This is fabulous with a few crackers. I also did not have any Parmesan but I think that would be lovely also.

Enjoy!